woodbowlsandthings

February 16, 2016

Pro-forme Hollowing tool

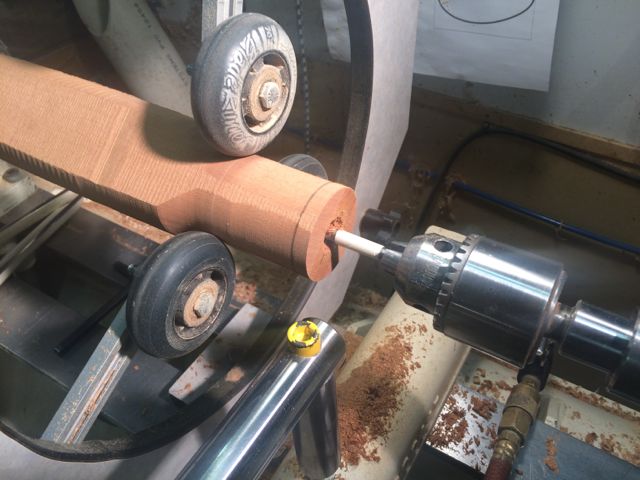
Last week while I was hollowing an 8″ tall cup form I decided it was past time that I tried the Pro-Forme Hollowing tool that I bought about 5 years ago.

IMG_2093

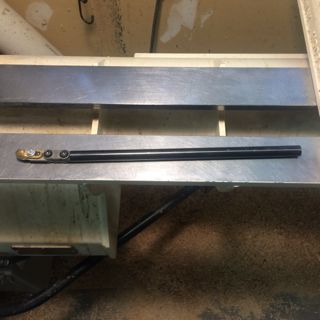
It has been sitting mixed in with the rest of my hollowing tools and every once in a while I would take the plastic cover off of it and then put it back. I had read that it was especially nice in end grain and even better if the wood is green. Today was the day for a trial. I put it in my Kobra Hollower, but before I started to hollow I drilled a hole with one of my modified spade bits to the depth I wanted to go. The Pro-Forme was set at the factory and worked like a charm. With practice I’m certain I could get as good or better finish inside than is possible with a scraper. I did notice that as I got beyond about 6″ the 1/2″ bar I experienced a little vibration but I was able to go the full 8″.
Thinking about how much I liked the way the tool worked and seeing that I had a spare cutter I felt I should do something to help with deeper hollowing. My first thought was to ask a friend of mine if he could make me a 1″ bar with the end modified to fit the Pro-Forme but this of course required me to buy a 1″ polished steel bar and seemed like it might be more work than it was worth.
I realized I already had a 1″ bar for my Kobra and all I needed was a short extension that could be installed in that bar to which I could attach the Proforma.
Luckily I have a few pieces of drill rod hanging around my shop and was able to find a 2 1/2″ long piece of 1/2″.

I clamped it in a vise and proceeded to notch it out with a zip cut blade my cordless grinder.

IMG_2095

IMG_2099IMG_2098
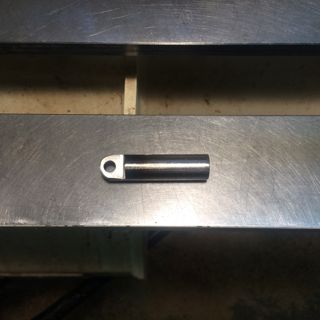
After some grinding, polishing and filing I completed the adaptor and hopefully can now go up to about 14″ deep.

IMG_2097

February 8, 2016

Which came first?

This question has been asked about the chicken and the egg for a long, long time. I think I finally have the solution.

If you have followed my blog at all, you will know that I really appreciate the art and turning skill of Betty Scarpino. I sat in on a wonderful all day Demo of hers and the next day was lucky enough to spend the day in a workshop with her as well.

Betty informed us that during the workshop we would be making and egg which would be finished with Liming wax, a pod and a candlestick holder.

After watching her demo I had a hard time sleeping that night as I was determined to use some or all of her ideas but bring my own slant to them. After all, I sure didn’t want to do a Scarpino, because no one could do one as good as she.

Sometime during the night I came up with a plan.

I would make an egg as per her suggestions and make a pod but my pod would be turned with more than two centres and would house the egg.

A little head scratching during the work shop but in the end I came up with this piece.

IMG_2050 IMG_2052 IMG_2053

The pod is maple, turned and hollowed wet. I finished it with a light coat of yellow glue and wood filler to give it some texture. Usually we texture by taking material away but a fantastic turner by the name of John Keeton suggested that I should try adding texture instead. The feel of the pod is really interesting, what a great idea John. Then with acrylics I painted the inside, added the branch from my driftwood collection and put the egg inside.

My solution to the age old problem is, the egg came first, it came from a pod . . .


Thanks Betty!

Don’t you just love a new Journey?

Filed under: Art, Wood Lathe — Tags: , , , — peteblair @ 4:32 pm

Well I sure do, especially when it starts and ends with turning on my Oneway wood lathe.
Recently I decided I wanted to see if I could find a way to turn a wooden spoon completely or nearly so on a lathe.
I made a few attempts and got some advise along the way but in the end I discovered that the inside of the scoop of a spoon can only be turned from the end of the spoon. As far as I know there is no other way to do it.
I tried turning the scoop part first as and ‘inside out’ turning where one turns a piece then takes it apart and uses the first turned part as the inside and then finishes the outside.
Sounds like it would work but nope, at least not for me.
Next I tried glueing two spoon blanks together. I left the spoon end square and drilled a hole then held the blank in a chuck with extra support for my steady rest and hollowed the inside of the spoon. Well I sure found out in a hurry that my hollowing skills are not the best. When split the two blanks apart the spoon ‘bowl’ was not quite what I had planned.

IMG_1983

IMG_2039

I soon decided that I needed glue the two blanks together with a filler through which I could hollow the spoon ‘bowls’. Once again my hollowing technique let me down.

Back to the drawing board. I realized that all I need is spacers on the ends of the two blanks. This allows me to see the line of the bowl through the space as it turns and now I can shape the bowl good enough that all it takes is a little sanding and its done.

IMG_2017

I discovered that drawing the shape on the outside of the blanks was not the best so I made up a bunch of different size oval patterns and drew it on the inside with a felt pen.

IMG_2049

IMG_2054

With this new found knowledge I can easily shape the bowl of the spoon, remove my steady rest and re-support the blank with a ball bearing tail center which then allows me to shape the outside of the spoon bowl.

IMG_2025

The next step was to try to get the handle of the spoon offset from the bowl part. I wanted to make the relationship between these parts more like a kitchen spoon.

I next cut the spacers in half with my bandsaw.

I then mount the spoon blank back on my lathe with the center of the handle in my drive spur and offset the handle near the cut line where I split the spacer.

IMG_1992

I wind up with a nearly finished spoon which only takes me a few minutes with a belt sander etc. to complete.


I’m quite happy with the result. What I have discovered is the depth of the spoon ‘scoop’ is relative to the thickness of the spacer and the width is affected accordingly.

One other benefit from this journey is that my wife is most delighted with all the spoons that I made along the way but which I was not quite satisfied with.

IMG_2031

She now has them having in the kitchen . . .

Create a free website or blog at WordPress.com.