woodbowlsandthings

February 13, 2018

Colouring Wood

Filed under: Art, Silver Maple, Wood Lathe — Tags: , , , , , , , — peteblair @ 12:41 pm

I know it’s probably been done to death but here is how I add color and pop to some of my wood turning.
I first start by turning to shape and sanding to about 220.

This piece is destined to have some sort of blow paint applied after the dye and then a shallow bowl turned in the center. I want a dark green for this piece.

Next I apply black Leather Dye.

Once this is dry I then sand it back quite aggressively with 220 grit.

At this point the piece could be complete. Ed Pretty from my Guild has finished at this stage and the piece was wonderful. I plan to go further and on this piece I wanted a little more black so another coat of the Leather Dye.

This is again aggressively sanded back.

I like this better and stopped  here. While most people seem at this point to go with the darker color I sometimes go light first and then the dark. In this case, Yellow and then Blue for the dark green I’m after.

Sanded back again but less aggressively leaving quite a lot of the yellow showing. I then applied the dark blue dye.

Doesn’t look like too much here but after a very light sanding with 400 here is what I have. A Hair dryer is sometimes used at various stages to hurry the project along.

A couple of coats of sanding sealer with light sanding in between.

Then on to my finishing turntable and a few coats of clear lacquer.

Now all it needs is the blow paint. I’m thinking gold iridescent but I might add a little yellow. Sorry no finished piece yet because I am in Hawaii and this piece will have to wait another week or so for me to get to it. I’ll add photos of the finished piece as soon as I have it done.

February 6, 2018

Horizontal spinner for wood art

Filed under: Art, Silver Maple, Tools, Wood Lathe — Tags: , , , , , , , , , — peteblair @ 7:04 pm

Ok, starting over, yesterday I  began this blog and something went wrong I lost the last half of my text and all my photos . . . . . . .

Greetings again from Kauai. Today we did manage to see and sit in the sun for about 2 hours, now that’s progress.

Wow, two blogs in two days (or three now) I often don’t do two in a year!

Killing time during another rain storm and waiting for spuds to cook on the BBQ.

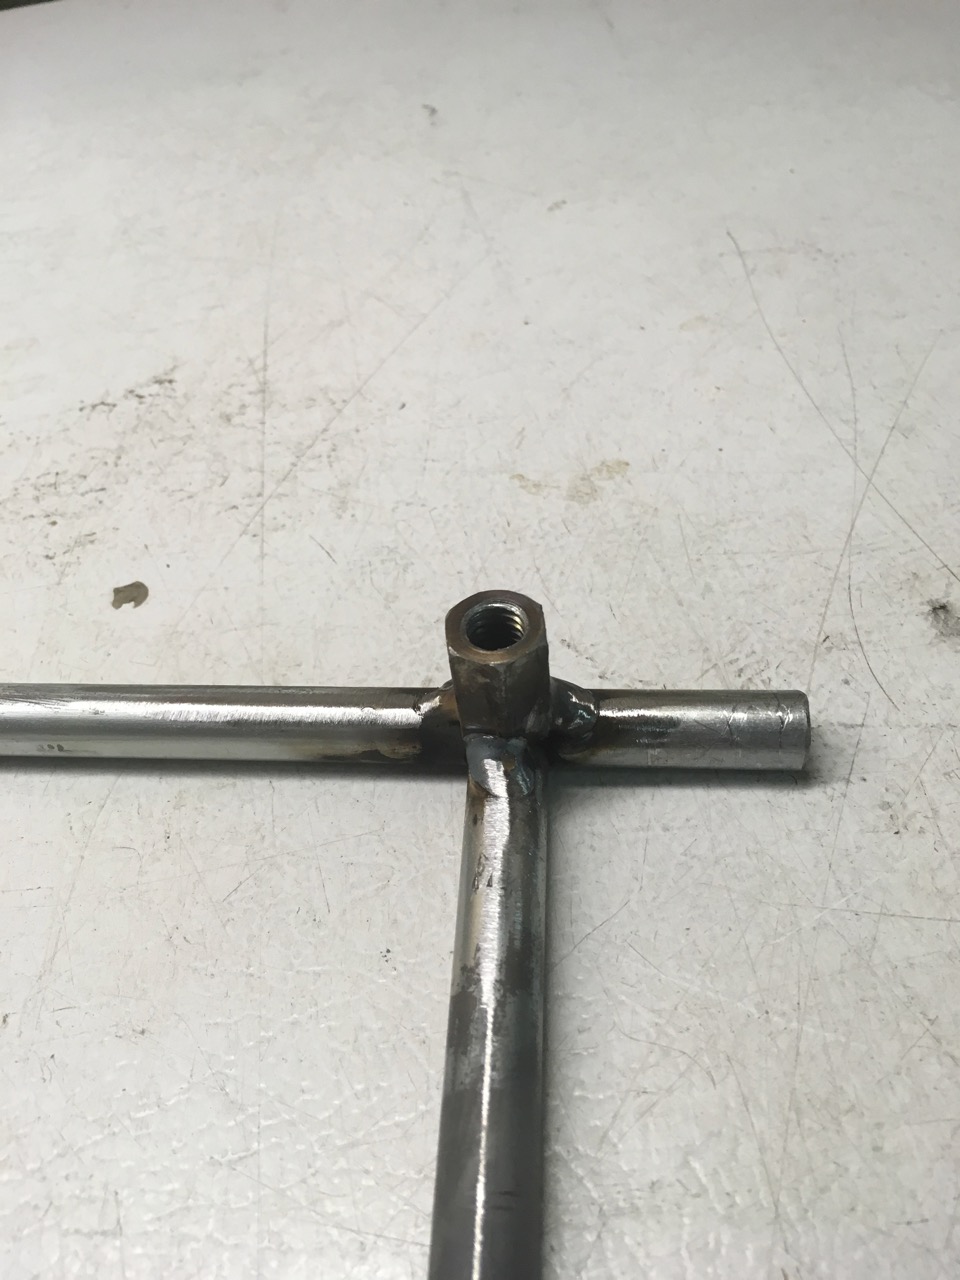
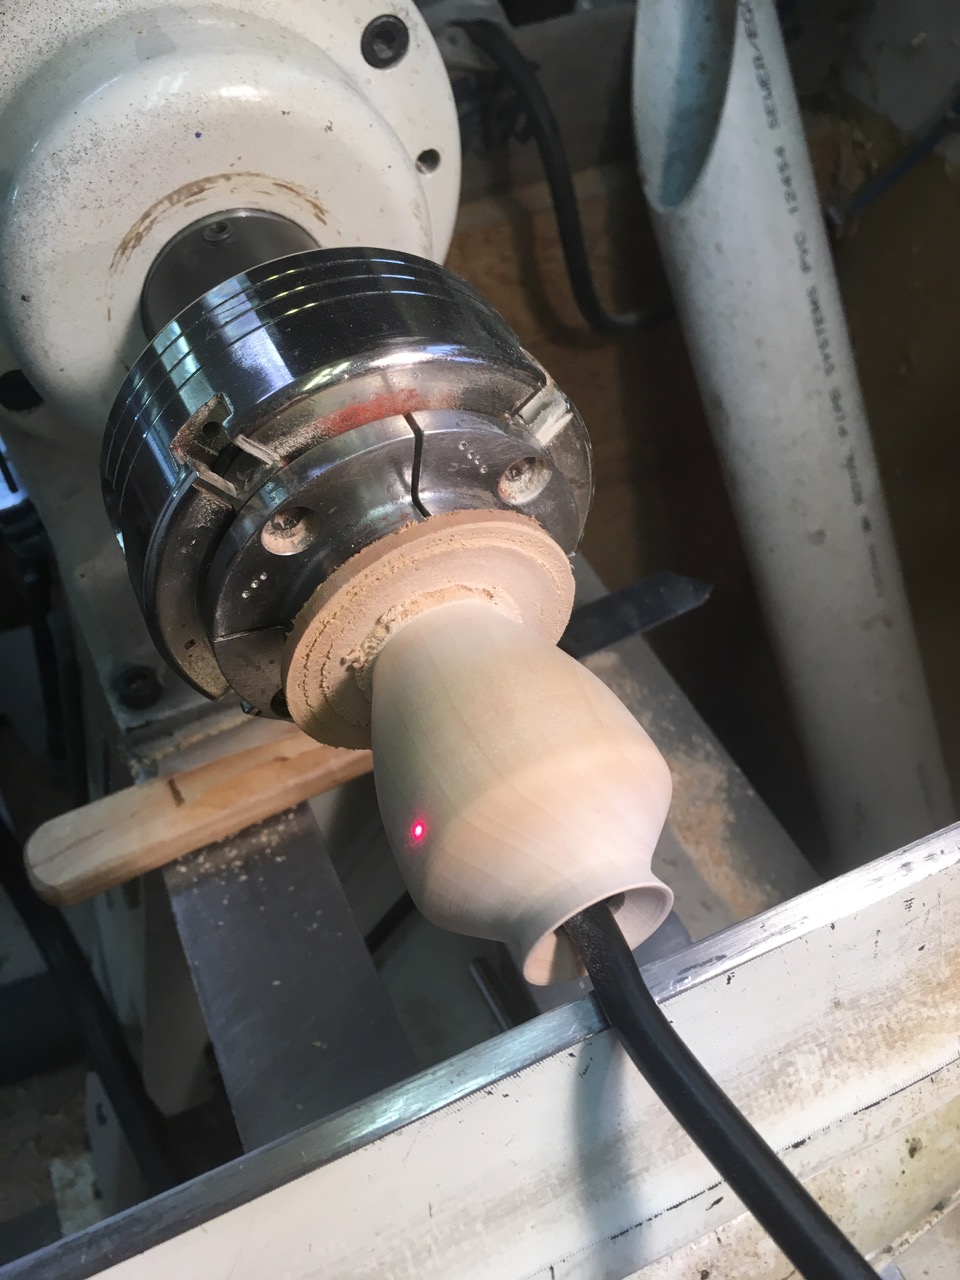
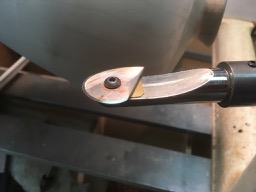
Todays topic has been rattling around in my head for more than a year. Some time ago I decided I wanted to be able to mount finished or partially finished items on a horizontal speed controlled turntable. This I felt would allow me to add color in a more controlled manner than when I do this on the lathe with the wood vertical. I wanted a device that would spin horizontally, be easy to adjust it’s spin speed, be reversible, be cheap and dependable. This is a photo of my first attempt. I’m utilizing a small chuck I use on my mini because it is easy to get threads to match from readily available bolts and threaded rod not like the M33 on my oneway.

IMG_3844

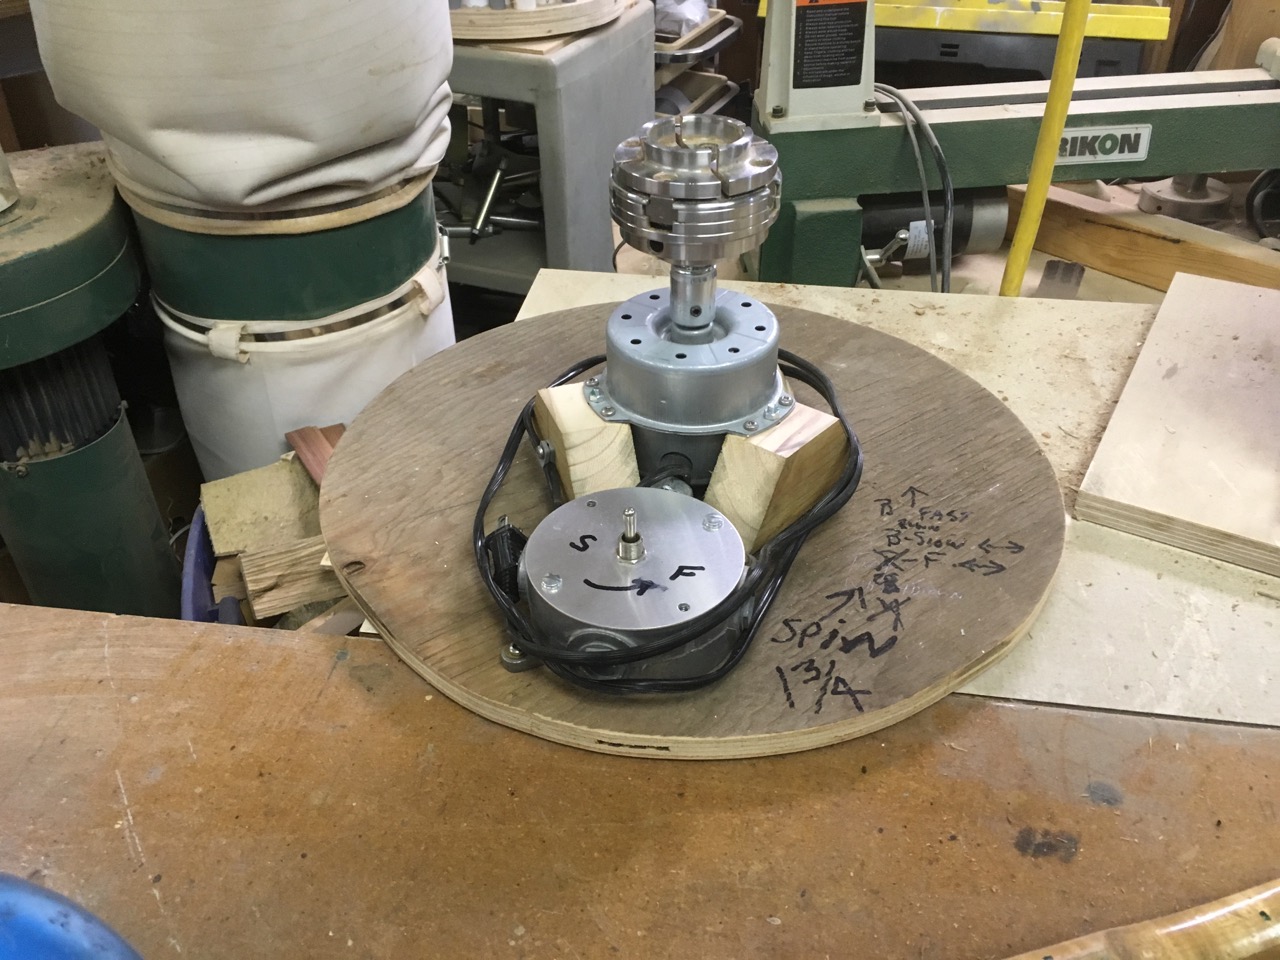
I started out thinking that I could use a fan motor and have collected a number of them over time but it soon became apparent that they were not as powerful or controllable as I wanted, primarily because they are not ‘brush’ type motors. I then switched my focus to an overhead fan. Knowing that people remove and replace them occasionally I advertised locally for a free used one but had no luck. There were a few that came available for a small cash outlay but being the cheap guy I am I stuck to my guns and decided not to pay for something I wasn’t certain would work for me.

In the end this all worked out for the best. I am known to peruse and buy on line from several local auctions and wound up with a “tool lot” that had an old beat up cord shredded 1/2″ drill. Ok, this should work fine, it was cheap, easy to control speed (brush type motor), reversible and top speed was about 1000 rpm.

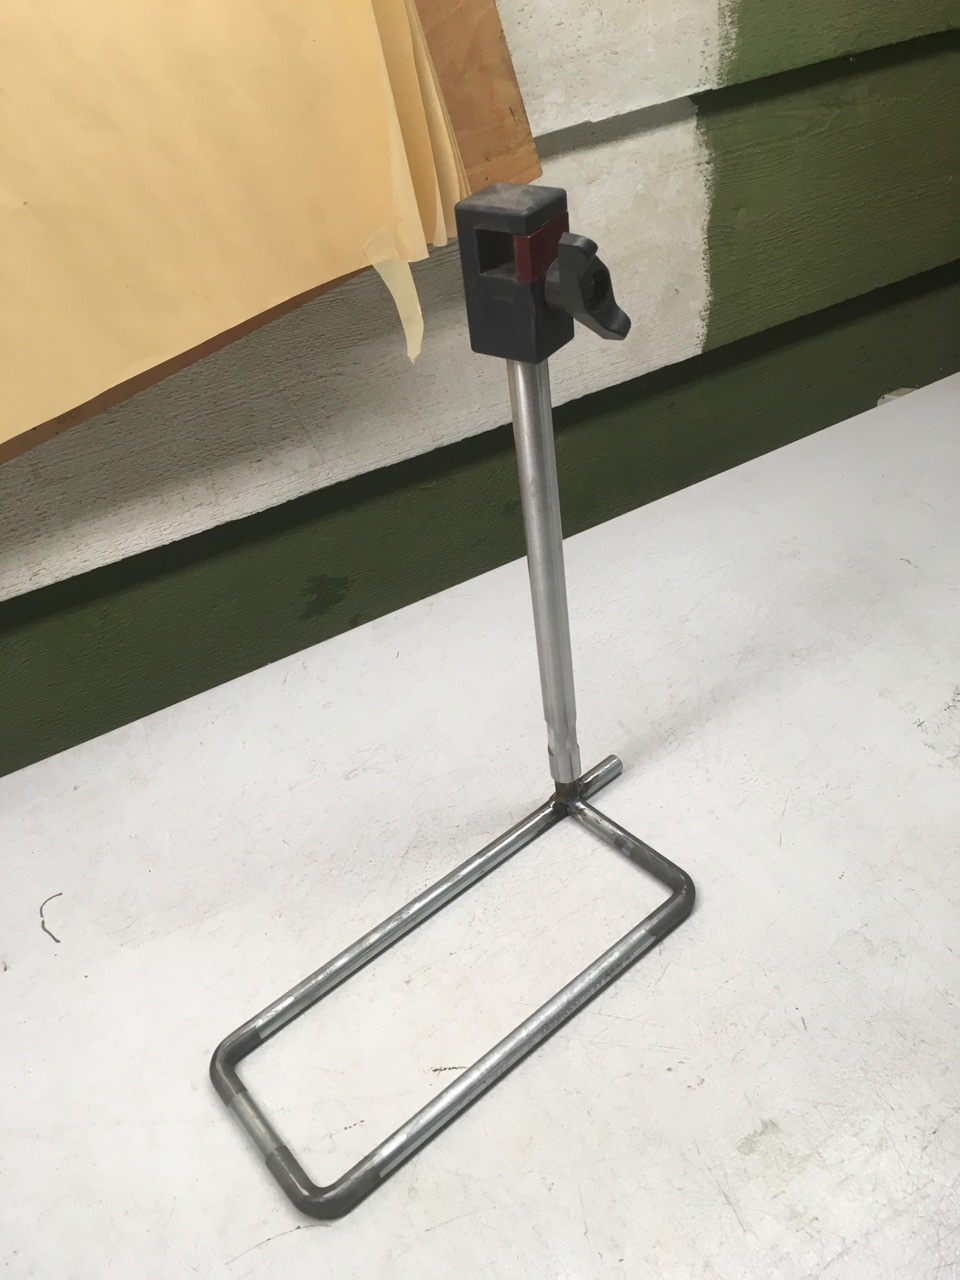
I changed my mind about mounting the a lathe chuck directly on a motor as I did with the fan motors and instead decided to use an old Pillow block I had laying around. I took a section of 1″ 8 TPI threaded rod and turned it to fit thought the bearings of the pillow block on my small metal lathe. I turned a short section on one end to 1/2″ so it would be easily gripped by the drill. I then mounted it to a section of plywood and discovered that with a small piece of rubber under the drill it lined up perfectly with the 1/2″ end of the shaft. As can be seen below this tool will now function as a lathe as well should I want to spin wood while finishing it or ????

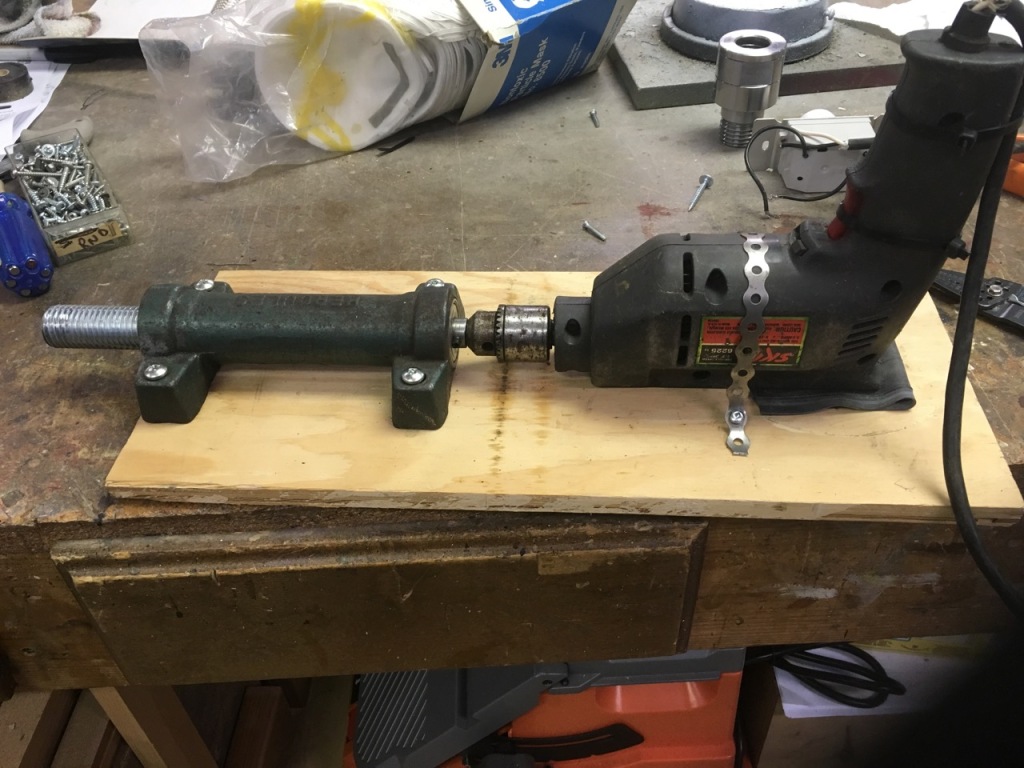
By mounting it on the edge of my heavy bench I thought it just might be able to take the shake it might get if the turned piece wasn’t quite balanced. Much to my surprise it spins with hardly a shake.

For now I am just clamping it to the work bench but soon will add some sort of fastening system. As you can see from the photo I utilized a dimmer switch in the supply line to the drill but soon discovered that I needed to be able to control the speed from above the table.

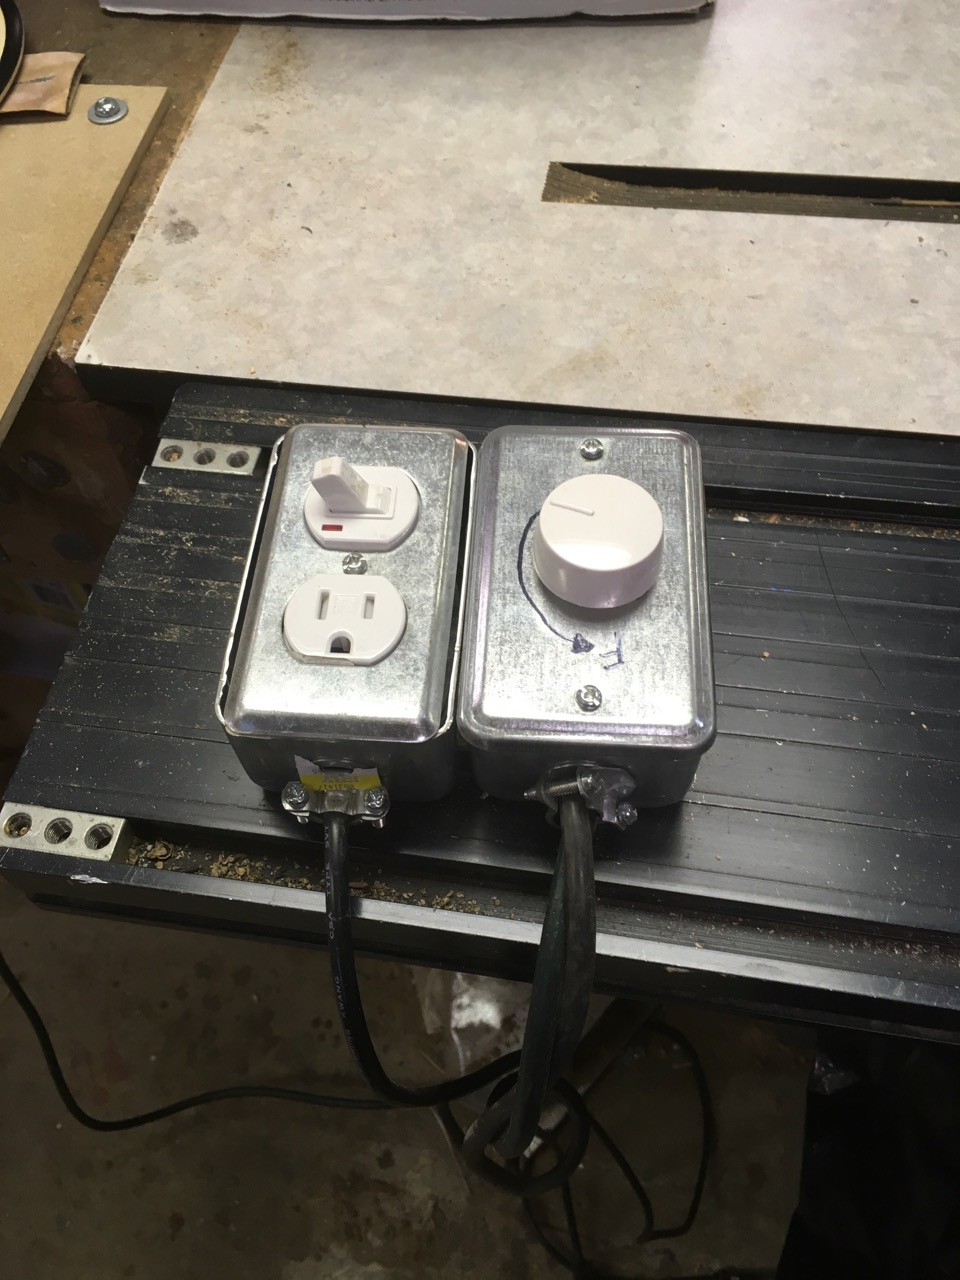
I now have a plug, on/off switch and the dimmer on long leads, these boxes are held together with a couple of magnets which allows me to separate them for storage.

Ok all works great but the dimmer I have, has the off position next to high speed and so I added an on off switch to the plug in box. The only really remaining issue is that I may want to move the reversing switch from the drill handle to the top with the rest of the controls. For now I simply use a small clamp to hold the drill switch in the full on position, and when I want to change the direction of rotation I have to remove the clamp, slide the reversing switch on the drill to the other position and re-clamp the drill switch. When I need to reverse the direction it is never in a situation where it has to happen quickly so this set up may continue to work.

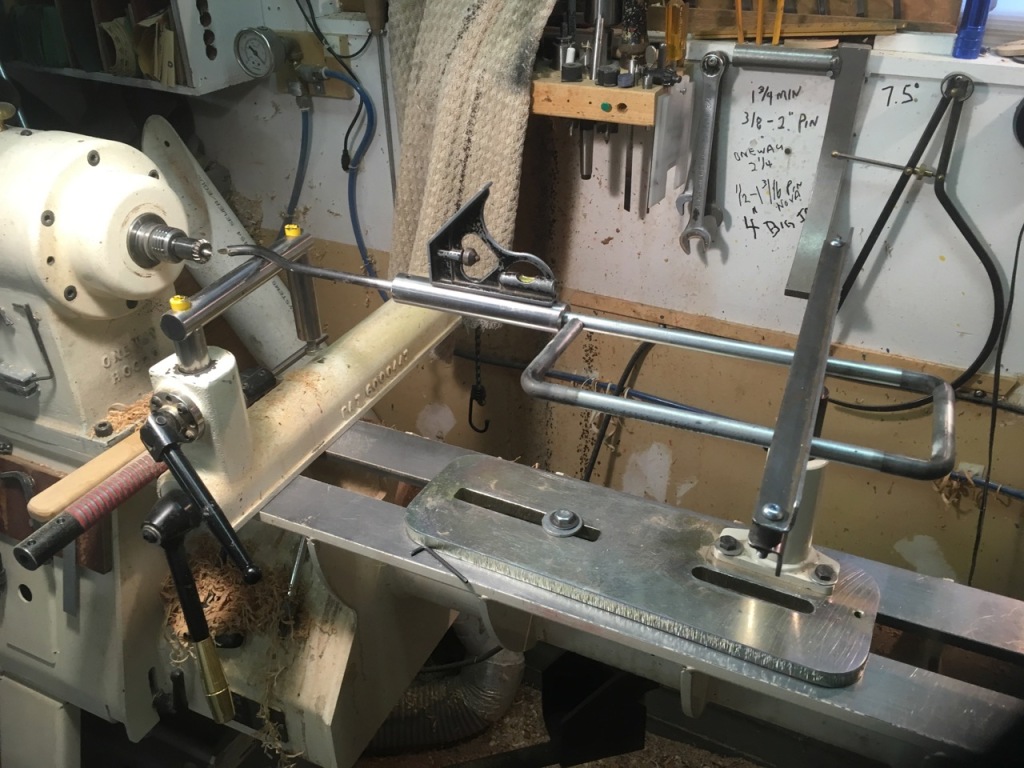
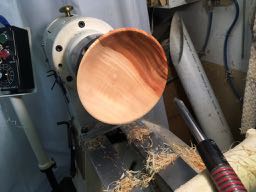
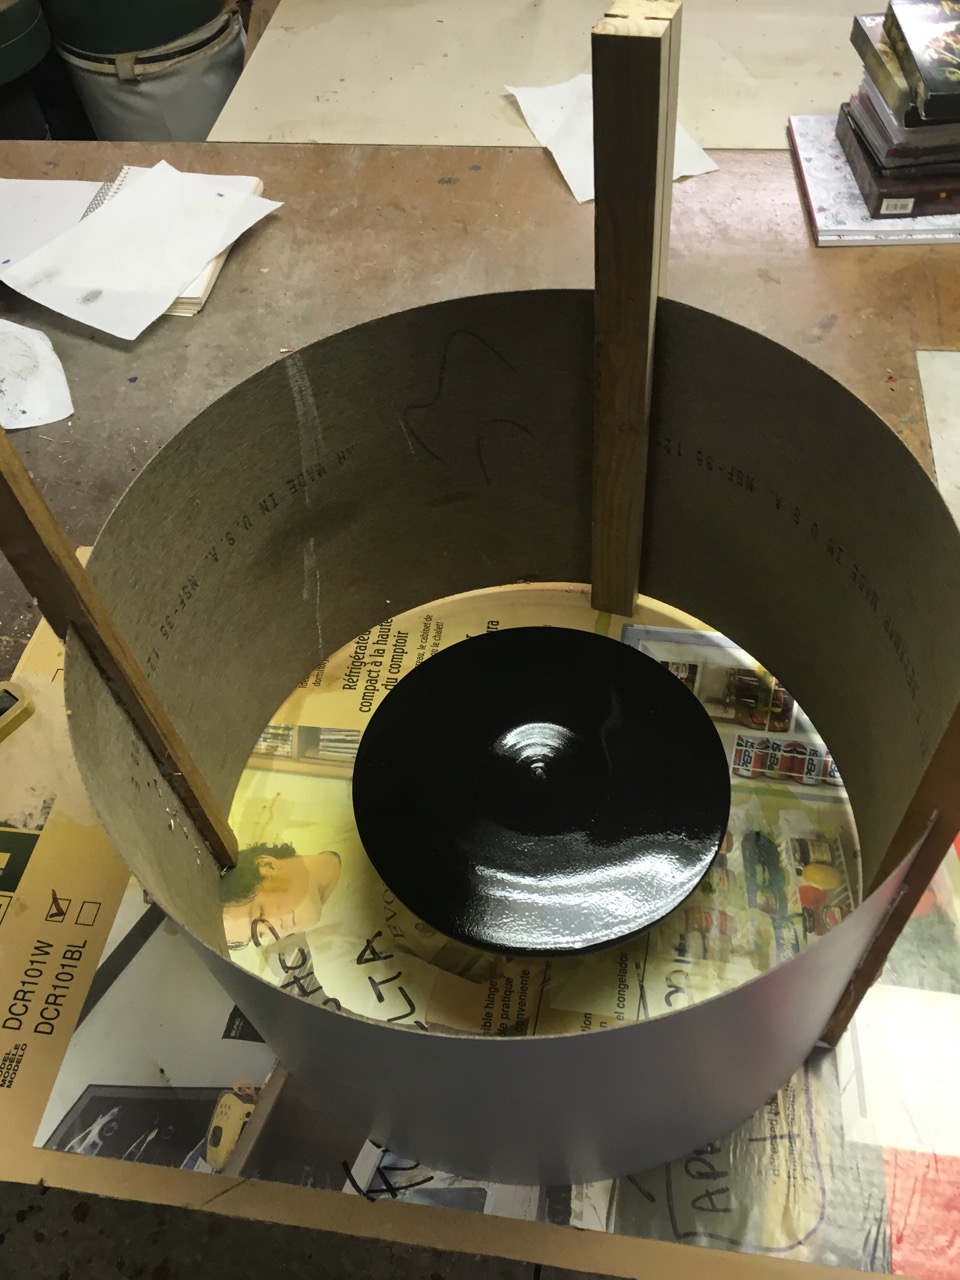
Here’s a shot of my first piece with just a piece of cardboard as a table, I have since added a piece of MDF that screws to my bench top giving me a much more stable work space.

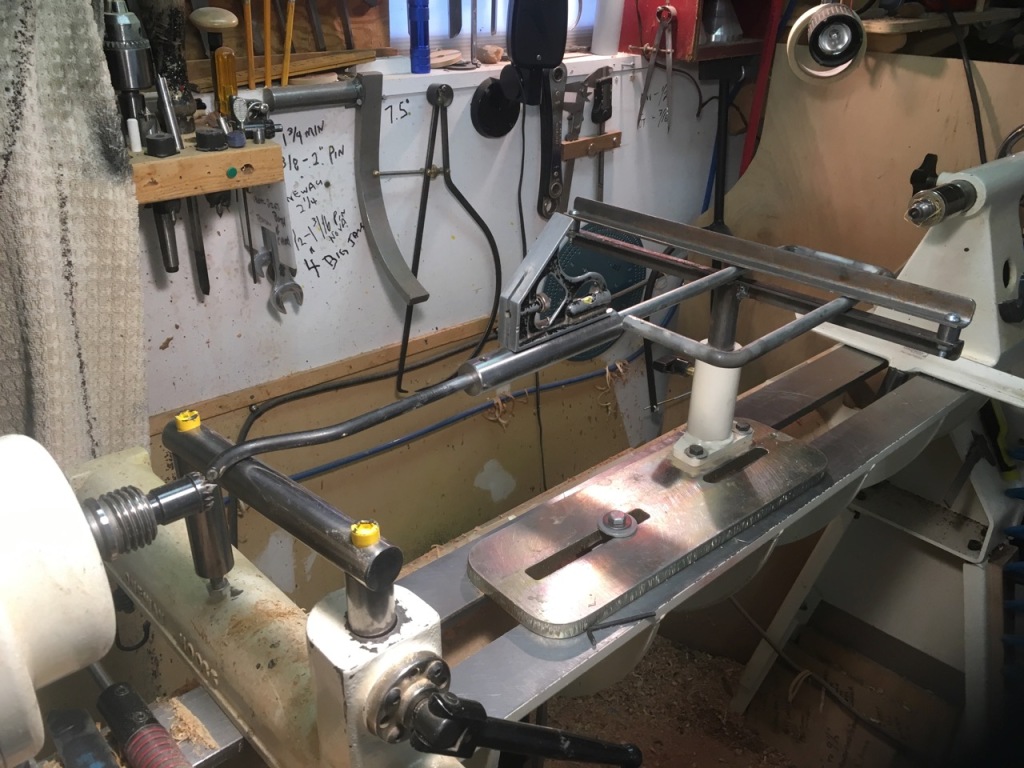
To control the paint/dye splatter I simply cut a couple of slots in a scrap piece of wood and bend a section of plastic laminate into the slots. Easily taken apart for storage. The photo below shows my first try at this when I was working with the fan motor above the bench top. I now have done away with the legs which are redundant.

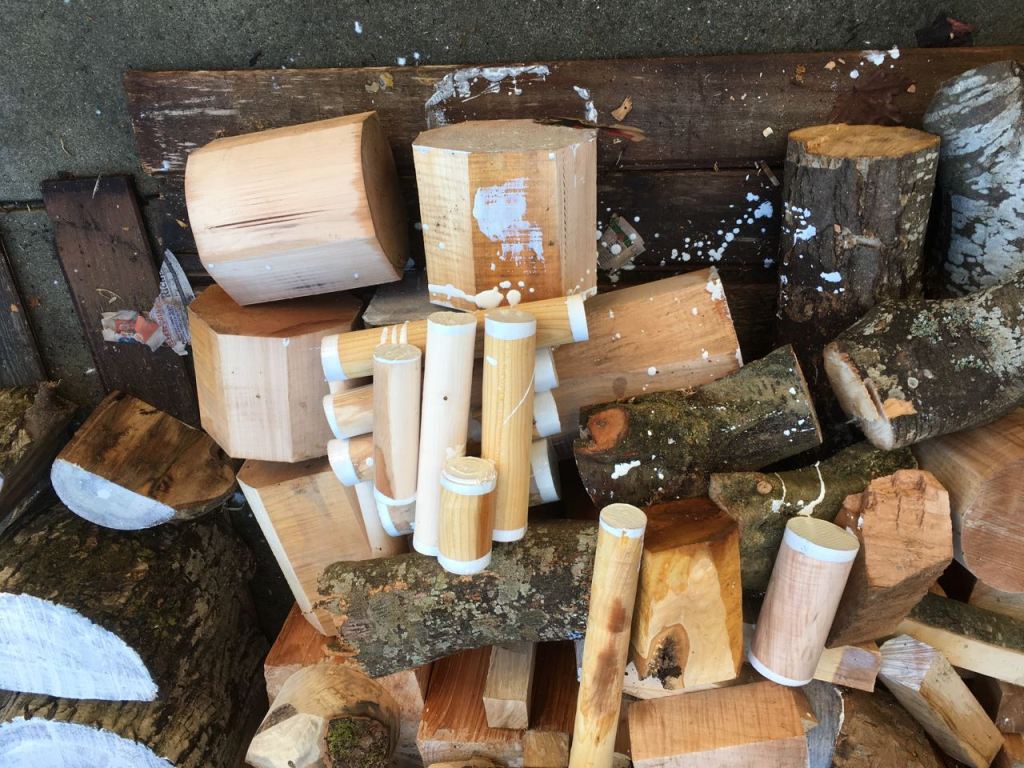
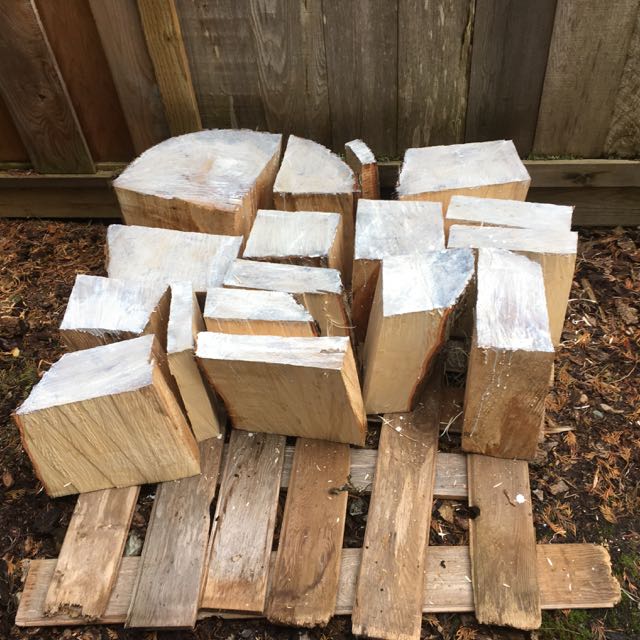
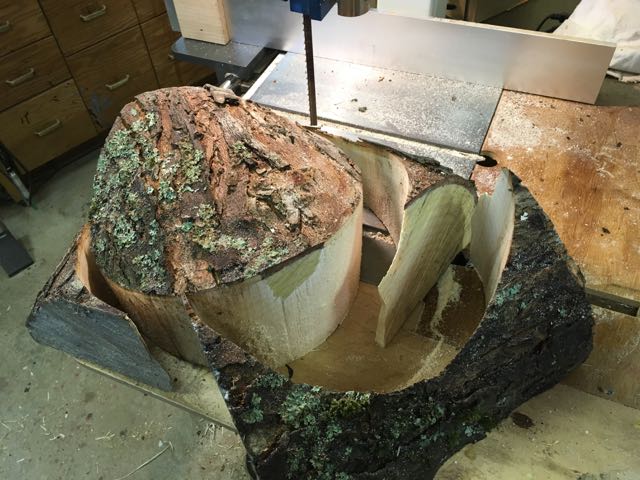
Here are a few of my first attempts. I don’t consider anything I do a failure just an opportunity to learn. The photo of the unpainted/dyed silver maple was just that. It was easy to remove the unsightly dye and start over.

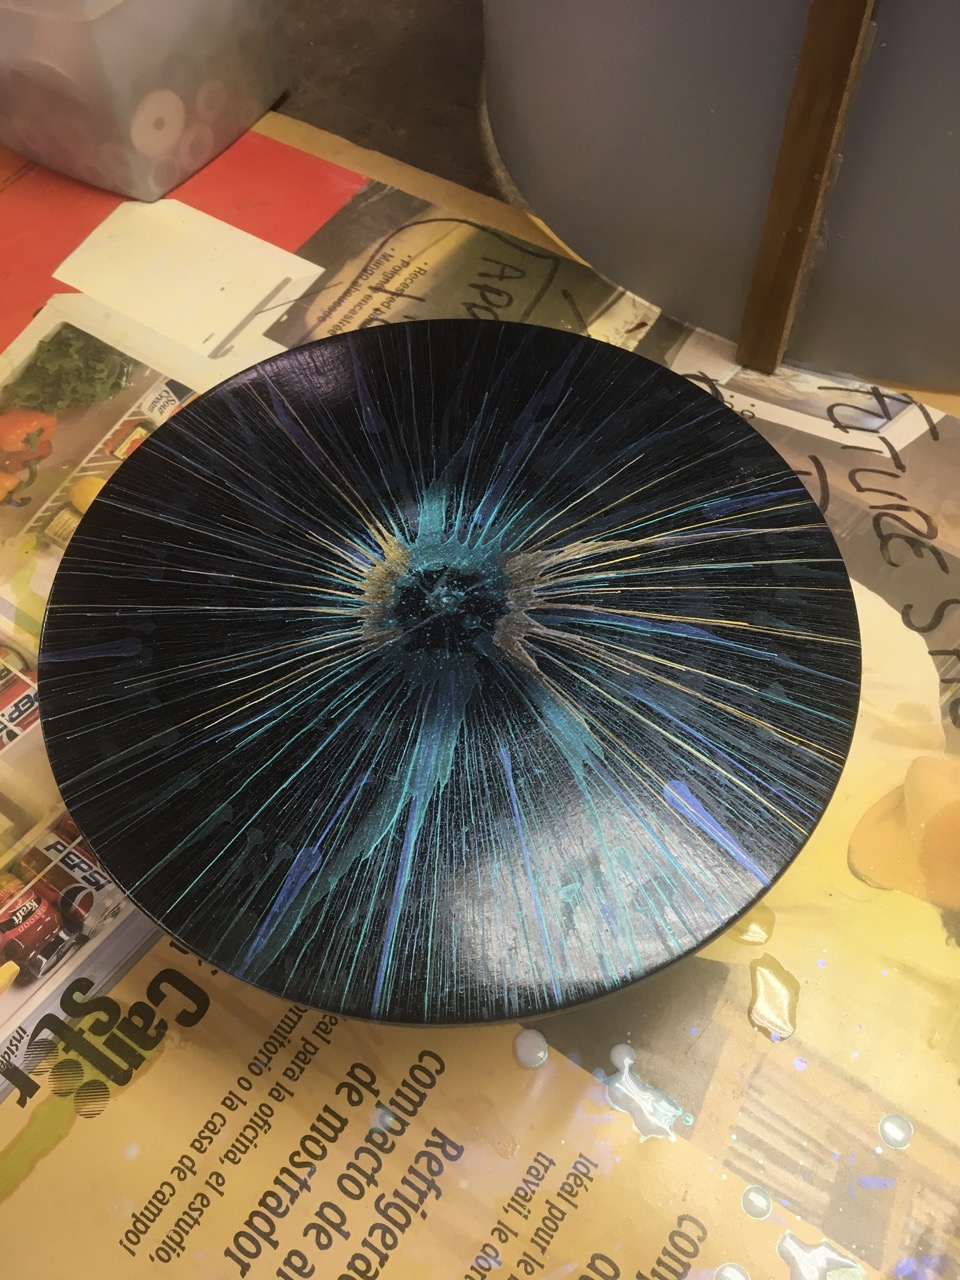
I am most interested in the ability to have the paint/dye move from the center or other locations in curved line.


February 4, 2018

Buffer for Wood Art

Filed under: Tools, Wood Lathe — Tags: , , , , , , — peteblair @ 1:22 pm

I am sitting in Kauai waiting for the rain to stop. I know, poor me, right? At any rate, I thought this would be good time to let anyone who is interested know what I have made to buff my wood art.

I should start by saying my journey started with the Beale Wood Buffing System. That’s the one with the three 8″ buffing wheels. It works like a charm but for me the closeness of the wheels to each other and the fact that I had to use my lathe made the system somewhat less than ideal. I do however continue to use the Beal Balls to do the inside of bowls, this I now do very infrequently.

I often watch local Auctions and saw a really nice two wheel buffer for sale. It had 2 12″ wheels, a 5 hp motor all on a stand etc.  I just had to have it. It was ok except for the fact that the buffing wheels were meant for metal or something and were sewn together in a spiral patters. I took a sharp knife and removed most to the sewing to make them a little softer. As you an see from this photo I had to make a few  modification. The wheels were set up to be in the center of the stand which wouldn’t allow me to access the buffing wheels as much as I needed. Another issue was the the motor needed to be physically moved to a different location any time I wanted to change the speed.

This buffer had 3 step pullys which did allow me with a little fussing to get a speed that worked. The problem was that the stand and set-up was just a little big for the space I have in my shop so I advertised and sold it locally. In retrospect I probably should have kept the parts and junked the stand but that’s water under the bridge.

I kept watching auctions and soon located a older but still very nice long shaft Baldor buffer. Got it home, set it up with my existing wheels but quickly discovered that the 3350 rpm speed was way too fast. I did a lot of research on the net to try to find a way to slow this puppy down without success. I must admit what with the technology available today that no-one (read here the Chinese) have not come up with a cheap speed reducer for a 110 brushless motor.  So once again this one went on the market and was grabbed right away. Oh, in the background you can see the Danish built bench grinder I also got at another auction. I didn’t even know it was included as it was hidden in the bottom of a metal cabinet I bought. Adding to that I didn’t know the Danes made stuff like this but it is a gem! Quiet, powerful and runs as true as any bench grinder I have see.

Before selling the Baldor I had decided that what I need to do was to build my own. Over the past many years I have collected quite a few bits and pieces of tooling and felt confident that with a small outlay of cash for a few items I would have no trouble making exactly what I need.

I should mention that while I had the Baldor I made 3 attachments one for each of the three buffing compounds I use Brown (tripoli), White (rouge) and Wax (carnauba). To make these I simply cut the heads off of 3 3/4″ bolts. I think I use 4″ bolts. I then drilled a 1/2″ hole it the end without the threads and drilled and tapped for a set screw to hold them in place on the motor shaft. By adding two nuts and washer I had easily replaceable arbours for my buffing wheels. I knew that my next model needed to be able to utilize these pieces.

On to the build. From Princess Auto I purchased two 1/2″ pillow blocks and a 5′ section of 1/2″ steel rod. I already had the bench, I wanted to share with the Bench Grinder so all that was left was to put a motor on the lower shelf, cut a slot for a V-belt and mount a length of 1/2″ shaft and the pillow blocks. I had a motor (1725 rpm) I had saved from a clothes dryer and also had a couple of 1/2″ pulleys. I didn’t take a photo but I do keep all three buffing heads in plastic bags to ensure I don’t add bits of metal or other items that might scratch my turnings. I raised the pillow blocks to get a more comfortable height for me and hinged the motor to allow it weight to tension the belt automatically. The pulleys are the same diameter providing me 1725 rpm but should I find the need to change speeds a simple pulley switch will do the trick.

Please don’t hesitate to ask or make suggestions for future posts or to comment on this one.

January 29, 2018

Hollowing Rig

Filed under: Tools, Wood Lathe — Tags: , , , , , , , — peteblair @ 3:33 pm

For a couple of reasons I have spent a few hours over the last little while making my own Jamieson style Hollowing rig.
One reason is because I just like to make stuff and another is because I wanted to see if this style of hollower would be easier to set up and provide more tactile feel when I hollow small vessels.
I am lucky in that I have a Kobra Hollowing System and find it great when hollowing larger forms but sort of clunky and overkill on small forms.
I also am the sort of person who has never liked to do anything twice if I could avoid it and so wanted too be able to utilize some parts from the Kobra and anything else I already have on hand.
I did test it today and found it easy to use but possibly not as easy to set up as I had hoped.
OK, here we go. I first decided that I needed to make only the two major components (the frame and arm) and as I said, I wanted to be able to adapt what I already have in the shop where possible.


I planned to use existing cutters and cutter holders and now know I want to utilize the laser and camera I already have as well as the tool post support from my Oneway Easy Core jig and the tool support from the Kobra.


I hunted around the shop to see what sort of material I had on hand that I could use. I found a three foot piece of 1/2″ steel rod and also a three foot piece os 1 x 1 x 1/8 angle iron. These two pieces should fit the bill.

My first dilemma was to decide if I should cut and weld the tool holder arm or just bend it. I know of others who welded theirs but thought what the heck I have a small torch with Mapp gas which I felt would do the job. I marked the 1/2″ rod to allow me to produce three bends and have a little stub left for attaching the tools holders to. Oh, by the way, the tool holders I am using were made for my Kobra by a good friend but because they are designed for smaller cutters I seldom used them. I had to drill a 1/2″ hole in each of the four different size ones to allow me to hold 1/4″, 5/16″,3/8″ and 1/2″. After drilling the hole I also needed to drill and tap two holes in each to allow me to  fasten these to the tool holding section.

I think I may have just been lucky when I heated and bent the three bends I did the bends only by eye and they came out flat and the final bend actually came out just about exactly the right length. I drilled a hole through the rod and into the end of the bent section and tapped in a ‘1/8″ Roll Pin.

Next to make the support stabilizer. Again I was lucky enough to find a section of 1″ diameter solid steel about the correct length. I cut a notch in one end about 1/2 way through and about 1″ deep.I had planned to bolt the bottom section of angle into this notch but changed my mind and got help from a friend to weld it instead. Glad I did this as it is much much more solid. The bottom was drilled and tapped to take a 3/8″ grub screw. I need to do this I think because when I change sizes of cutters I also have to change the height of the holder to ensure I am cutting on or just below center.

Next I needed spacers that were just slightly longer than 1/2″. Here my small metal lathe really came in handy. I was able to chuck up a couple of short pieces of 1/2 tool steel and precisely make the length I wanted. Because I am not planning to do any larger work with this tool I wanted the two parts to slide easily inside one another.

After bolting the angle together with 1/4″ bolts and lock washer with my prepared spacers in between it was time to test the rig. Today I chucked up a small piece of Gravenstien Apple and began the test. I want to be able to work through a small as possible. This means that I can use 1/4″ tools through a 1/2″ hole but even at this the tool does drag a little on the bottom of the opening. I believer the ideal size of opening should be just larger than twice the diameter of the cutter bar.

It worked really good but I soon realized that the continual stopping to test wall thickness and starting again was as pain and I needed to add either or both my laser and camera set up. To allow this I found in my stock a 3/8″ joiner nut which I cut in half then faced off with my metal lathe. I took it to the local Machine shop and paid the grand sum of $5.00 ( no receipt of course) for them to weld it to my rig. This is the same thread as is on the post that holds my laser and video camera.

Here’s what the setup looks like from a couple of angles and then with the laser and camera. It does appear overkill but you know what? I don’t care. I may make a new shorter support bar to get the laser and camera closer but for now I think I can work with it just fine.

November 10, 2017

Negative Rake Scraper

Just a quick note to let anyone who might be interested, know that I now use a negative rake scraper with my hollowing rig. Up till recently I was using a tear drop shaped scraper sharpened in the standard manner but found that on occasion it was just a little grabby.
I thought why not make it into a neg rake scraper so I ground it to about a 60 degree included angle.
After changing the angle the center of the scraper was no longer on the center line and to make up for that I just added a small brass shim under the scraper. I think it is still slightly below center but it seems to work just fine for me.
Seems to work just fine for me.


April 17, 2017

Gravenstein Apple Wood

A few days ago my wife pointed out that someone in our small community was trying to get rid of some fresh cut Apple wood. The party was offering it for free as fire wood. I contacted the seller and asked if she still had the wood and if I could come and pick a few pieces to turn on my lathe? At the same time I offered to make her a small item from the tree as a token of my thanks. Fruit wood is one of my favourite wood to turn. Its dense and hard and turns like a dream when wet. A few of the pieces were too large for me to lift and get to my truck and the yard was suffering from all the rain we have had and was pretty muddy and slippery!

246628db7fa3699bbe8942e97fc4e93b

Early today I began cutting the 9 sections of the tree that I had hauled home. Below is a photo of the last three pieces in the bed of my truck.

IMG_4032

I just love cutting turning blocks from green wet wood. My chainsaw seems to just melt through it as long as I cut with the grain (rip) and don’t try to cut across it.

In a few hours I had processed it all and was ready to coat the end grain with a lumber sealant to try to minimize checks and cracks. Fruit wood is notorious for cracking so badly it is at times almost impossible to use.

Apple often has a really dark center or section surrounding the heart wood of the tree with provides a nice contrast to the light outer wood. This tree had been growing almost parallel to the ground and as a result had the heartwood way over on one side. I have never seen a tree with the heart so much off center. This worked to my advantage as it allowed me to get larger pieces with out the pith!

After I had coated both ends with Log Sealer I put it all under a small deck in my back yard and covered it with a sheet of plywood. I am having a lot of trouble with mould on wood that I cover with a tarp so decided to try the plywood instead to see if it would let a little more air inside. If you look closely you may see that most pieces now have a sort of orange bloom. Not sure what that is about.

Was able to find a little time today to spin a few small pieces. The plan was always to make a couple of small items to give to the family in thanks for sharing their tree with me. Never know how green wood, especially green fruit wood will dry and if it will crack or not and as a result I never know what I will give back to the Tree owners until a piece is complete.

The top three photos are a small bowl and the last three are of a ‘cup’ shape which I hope to try dying. I turned them pretty thin about 3/16 or a little less and set them on my boot/wood dryer to speed up the drying process and to see if blowing air inside a form will help it dry without splitting.

The apple is almost dry and has not split but has chosen a really nice organic shape that it wants to be. I found it interesting that as it dried the dark centre or heart wood became quite light colour. I’m hoping that when a finish is applied it will darken again.

I then made a small handle and a sphere which will be joined but a string to make a game of skill where one tries to swing the ball up and catch it on the handle. I am making this for the young lad who lives at the home where I got the wood. Apparently he was really attached to the tree and I’m hoping that this game will give him some pleasure.


I next put the ‘cup’ form back on the lathe and dyed it black. When dry I will sand most of the black off and apply a blue dye which I hope will highlight the grain!

Here’s what it looked like before I started to apply the final finish.

It was pretty cool when I began spinning this piece as I was surprised with a ? mark. Could it be the wood wondering what I was going to make?

February 16, 2017

To Brand or not to Brand

Filed under: Art, Wood Lathe — Tags: , , , , , , , — peteblair @ 7:49 pm

I wonder how many other artists have wondered if a ‘brand’ might be a good idea? I know there are a lot of Artists whose work can easily be identified but for artists like myself this is a real long-shot!
I really like to identify my art with my name and a number. The number primarily for me to keep track of where my art winds up and to be able to keep a data base of information.
The problem for me was that on occasion I make smaller things to sell and often don’t have the inclination or space to actually sign them.
For about the last 2 years I have been adding a ‘brand’ it is a stylized icon combining my first and last initials. P and B. i have been burning my ‘brand’ with a pyrography pen which is a real pain if I am ‘branding’ 20 or 30 items at a time!
Here is a shot of the ‘brand’ I just bought on line. I was able to purchase just the branding end as I already have a Weller soldering iron I wanted to use.
I am now using on all my art work. I still sign my better pieces, and add the brand, but for craft type items I can now brand a bunch in a very short time.

img_3645

February 10, 2017

Cut and Paste

Filed under: Wood Lathe — Tags: , , , , , , , — peteblair @ 6:42 am

This is part of another piece that I can’t seem to get finished. I needed, I thought to post them here so I could use the photos on a turning site but I can’t get it to work. At any rate, the first shot is the sail which I cut from a platter of Horse Chestnut the other photos are the sail boat assembled. The hull started out life as a bowl from the same wood, all of which I was given by John Spitters, the end grain was so punky I was unable to cut it cleanly so I removed it and glued the two remaining sides together for the hull. Hopefully, one day I will get my act together and finish the piece.

img_3186 img_3657 img_3658

January 23, 2017

Freeze Drying Wood

Filed under: Wood Lathe — Tags: , , , , , , — peteblair @ 4:49 pm

I know this will not put all the questions about this method of drying wood to bed but I may answer a few of the questions.
My wife decided that she would rather have an extra refrigerator than an extra freezer. So I was charged with emptying the wood I have been storing out of the freezer.

I am not really good at keeping notes and as I age my memory hasn’t seemed to improve and as a result I am guessing about the length of time the wood has been in the freezer. There are lots of different sized pieces of Vine Maple, Big Leaf Maple and Cherry. The best I can do is to say that all pieces have been frozen for at least 3 years and I suspect more like 5 years.

I have 2 x 2 spindle blanks, large cut pieces about 8 or 10 wide by 8 to 14 inches long. In addition I stuck a few uncut pieces of the main trunk of a vine maple.

img_3553 img_3554 img_3555

I do need to qualify that a year ago we had a mishap and the freezer was unplugged for a week in which we lost a lot of frozen fish.

Some of the pieces of wood were actually frozen in the bottom of the freezer in the water from the mishap. Some pieces seem to have spalted during their time in the freezer.

I moved all the pieces out of the freezer to begin to thaw. It should be noted that the weather in here has been cool from about 0 and night to 8 or 10 during the day.

Removing the wood from the freezer the only checking I saw was in two of the larger blanks where the wood in two blocks has split on the annual rings. img_3570Absolutely no checking was seen on the ends of any of the whole log sections, these all still have bark on them.

Today I took a number of the spindle blanks and turned them round. I coated half of the rounds with Anchor seal, at the same time I coated about half the rest as well.

img_3573 img_3572

img_3571

Time will tell if either the coated or untreated will check and/or crack.

I did notice when turning the spindle blanks that the wood while still partly frozen seemed quite dry and the curlies felt dry. Quite unlike some other wood that I have been turning that was cut recently and frozen as a result of our cold spell. That wood all felt wet and the curlies did as well.

I am keeping most of the wood outside on a concrete pad, sitting on some cedar strips under a tarp.

Tomorrow I will bring a couple of pieces into my shop and weight them to allow me to judge exactly how dry they are after the freezer treatment.

If you have any questions or comments, please leave me a note.

I have since turned and finished two of the pieces from he bottom of the freezer. These both have lots of salting. I noticed they were VERY hard, such harder than any spalted maple I have ever turned. The were absolutely dry as a matter of fact they were so dry it was difficult to turn them without a very sharp gouge and very light cuts.

I have lots more to turn but believe the freezer dying, if the wood is left in it long enough is a very good way to dry wood.

November 23, 2016

Coring Silver Maple

Filed under: Wood Lathe — Tags: , , , , , , , , , — peteblair @ 4:10 pm

I have been really lax and haven’t blogged in a very long time and it’s about time I got back to it.
A few weeks ago a friend let me know that he was having a huge Silver Maple removed from his yard and told me I could have as much of it as I wanted. Oh boy! problem was I had just had a hernia repaired and was out of commission for several more weeks. Luckily for me I have some good friends and a strong young and willing grandson who were able to cut the large pieces into small enough chunks that they could load in my trailer.

img_3154

img_3162
As I began to feel better and after a talk with my surgeon who said I was able to begin lifting and with the help of my wife I was able to slide the pieces one at a time, a few a day, onto a furniture dolly and push it into my shop where I was able to cut them into more suitable pieces with my faithful electric Poulain chain saw.

img_3184
After they were cut we moved them with another dolly to the back of our yard where I coated the ends with Anchor Seal and covered them with a tarp.

img_3185

This past Monday I brought one of the larger sections into the shop and prepared it to be cored by cutting it mostly round on my band saw.

img_3216

img_3218

img_3219

Next it was mounted on my lathe and I began to core.

img_3220

img_3223  img_3224

img_3226

I was able to get four bowls from this blank.

img_3227 img_3230

Coring is the process by which little wood is wasted as the center of each bowl produces a smaller bowl. If the wood is dry more bowls can be cut, but because this wood is wet I have to leave them thicker to allow me to turn them to final thickness when the are dry.

I am now in the process of Microwave drying them, the biggest is 12″ in diameter and will be a great salad bowl.
Upon coring them I discovered a small amount of ‘birds eye’ which is most predominant on the second largest bowl.

Older Posts »

Blog at WordPress.com.