I know it’s probably been done to death but here is how I add color and pop to some of my wood turning.
I first start by turning to shape and sanding to about 220.
This piece is destined to have some sort of blow paint applied after the dye and then a shallow bowl turned in the center. I want a dark green for this piece.
Next I apply black Leather Dye.
Once this is dry I then sand it back quite aggressively with 220 grit.
At this point the piece could be complete. Ed Pretty from my Guild has finished at this stage and the piece was wonderful. I plan to go further and on this piece I wanted a little more black so another coat of the Leather Dye.
This is again aggressively sanded back.
I like this better and stopped here. While most people seem at this point to go with the darker color I sometimes go light first and then the dark. In this case, Yellow and then Blue for the dark green I’m after.
Sanded back again but less aggressively leaving quite a lot of the yellow showing. I then applied the dark blue dye.
Doesn’t look like too much here but after a very light sanding with 400 here is what I have. A Hair dryer is sometimes used at various stages to hurry the project along.
A couple of coats of sanding sealer with light sanding in between.
Then on to my finishing turntable and a few coats of clear lacquer.
Now all it needs is the blow paint. I’m thinking gold iridescent but I might add a little yellow. Sorry no finished piece yet because I am in Hawaii and this piece will have to wait another week or so for me to get to it. I’ll add photos of the finished piece as soon as I have it done.
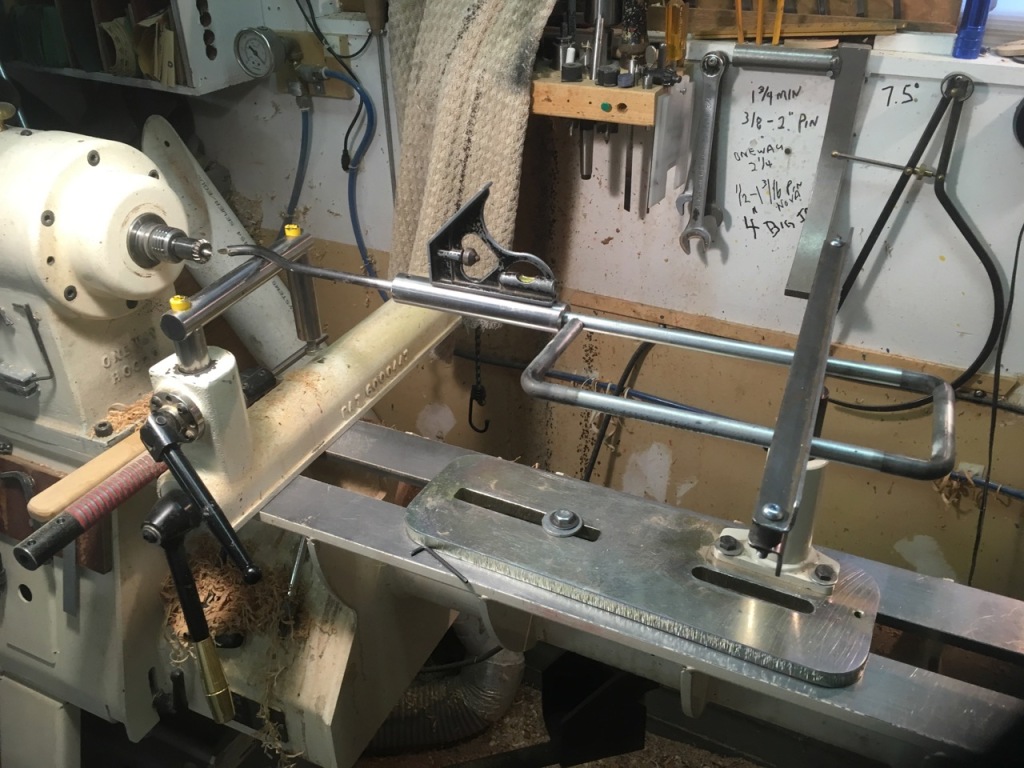
For a couple of reasons I have spent a few hours over the last little while making my own Jamieson style Hollowing rig.
One reason is because I just like to make stuff and another is because I wanted to see if this style of hollower would be easier to set up and provide more tactile feel when I hollow small vessels.
I am lucky in that I have a Kobra Hollowing System and find it great when hollowing larger forms but sort of clunky and overkill on small forms.
I also am the sort of person who has never liked to do anything twice if I could avoid it and so wanted too be able to utilize some parts from the Kobra and anything else I already have on hand.
I did test it today and found it easy to use but possibly not as easy to set up as I had hoped.
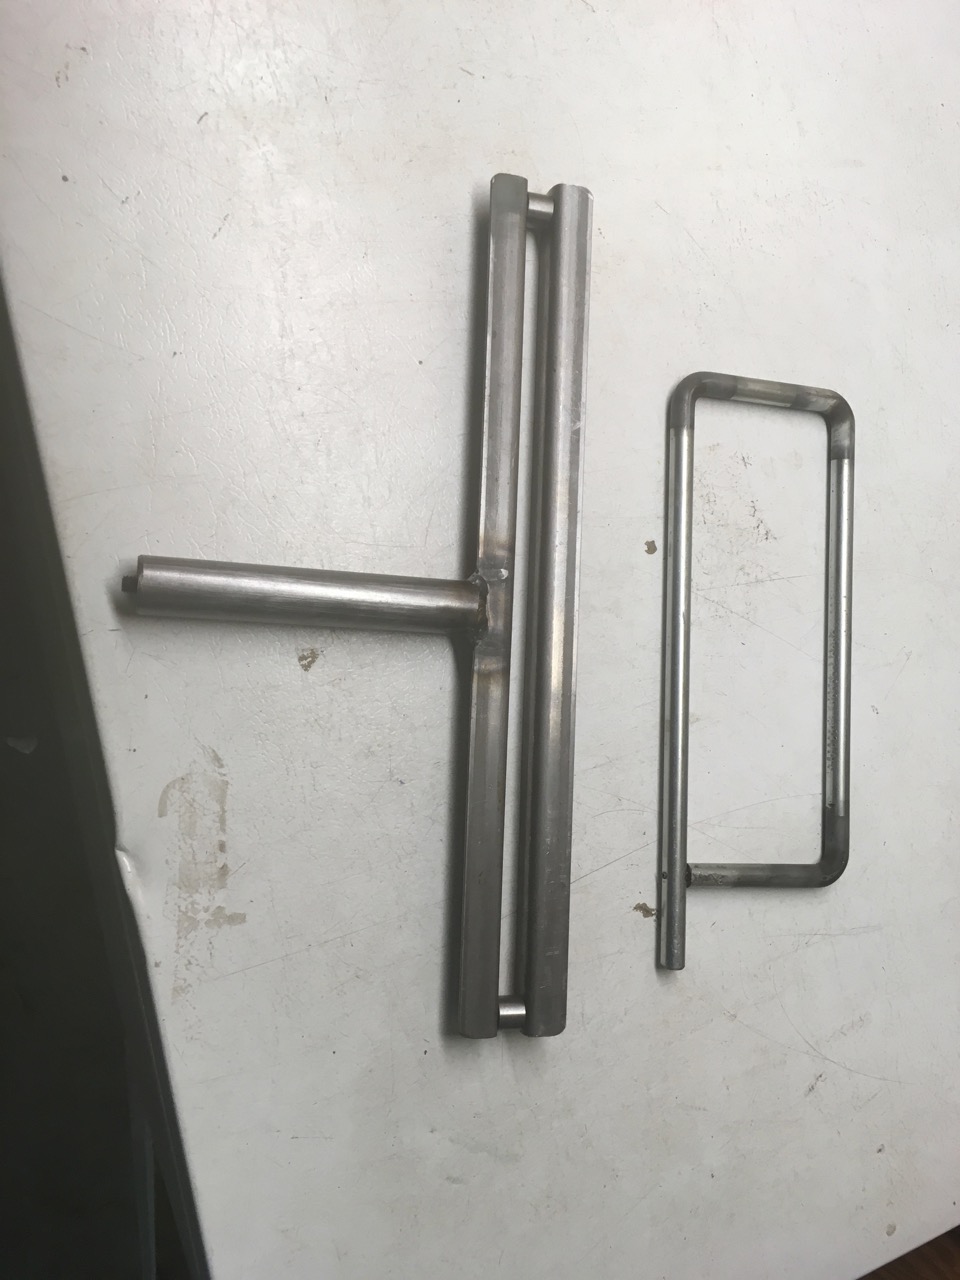
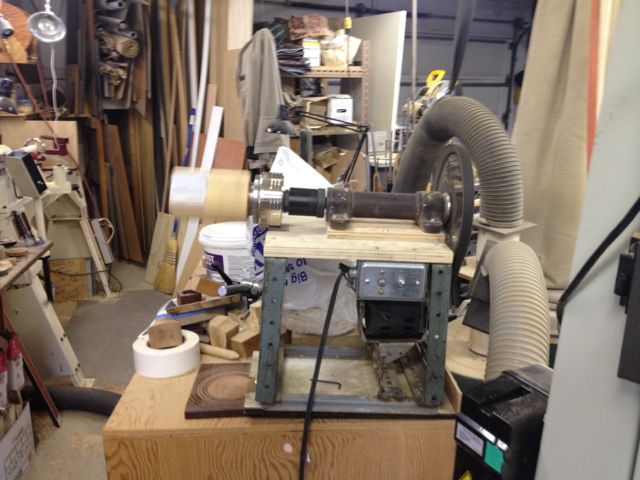
OK, here we go. I first decided that I needed to make only the two major components (the frame and arm) and as I said, I wanted to be able to adapt what I already have in the shop where possible.
I planned to use existing cutters and cutter holders and now know I want to utilize the laser and camera I already have as well as the tool post support from my Oneway Easy Core jig and the tool support from the Kobra.
I hunted around the shop to see what sort of material I had on hand that I could use. I found a three foot piece of 1/2″ steel rod and also a three foot piece os 1 x 1 x 1/8 angle iron. These two pieces should fit the bill.
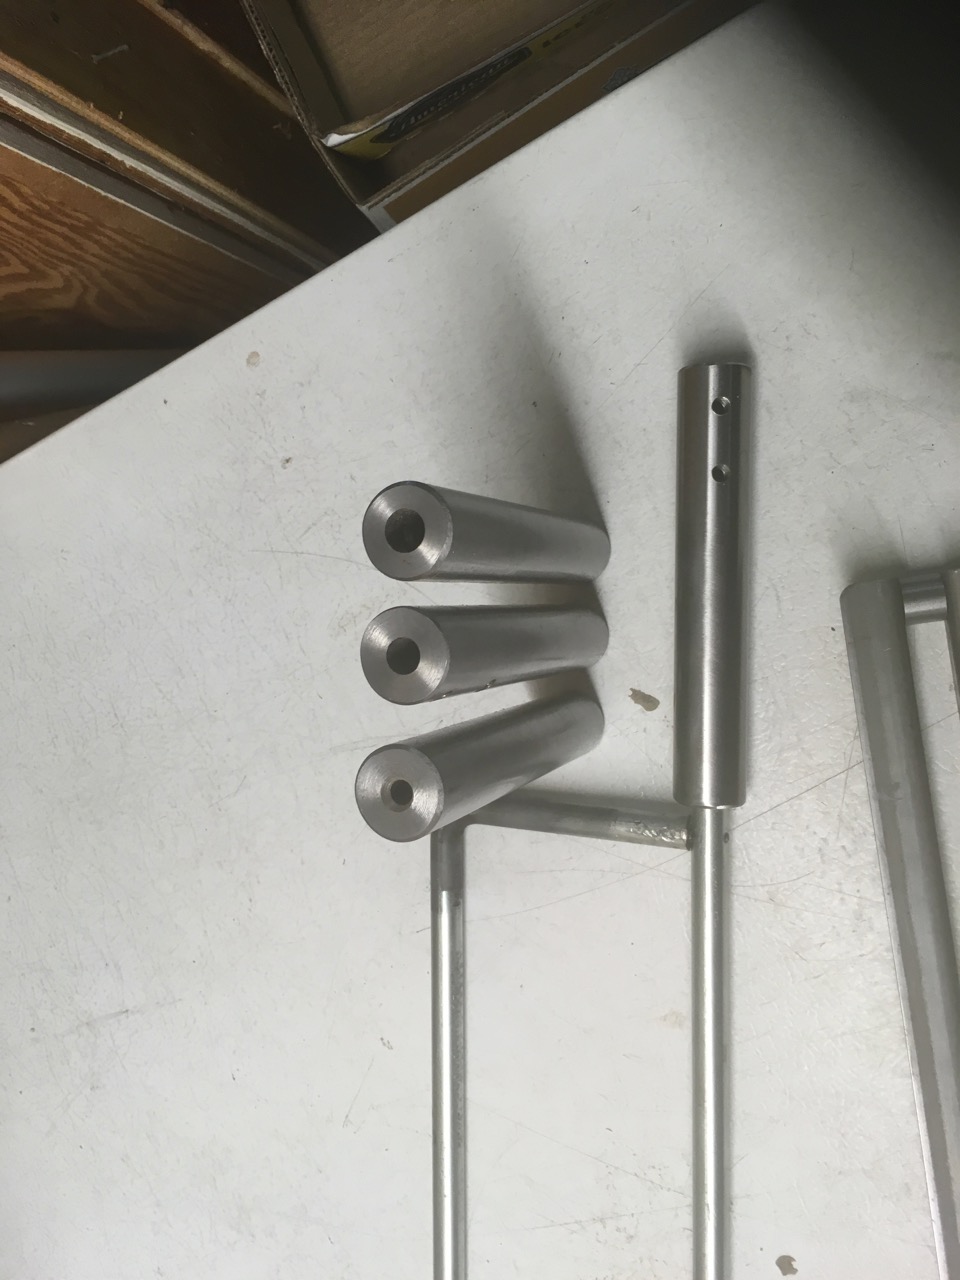
My first dilemma was to decide if I should cut and weld the tool holder arm or just bend it. I know of others who welded theirs but thought what the heck I have a small torch with Mapp gas which I felt would do the job. I marked the 1/2″ rod to allow me to produce three bends and have a little stub left for attaching the tools holders to. Oh, by the way, the tool holders I am using were made for my Kobra by a good friend but because they are designed for smaller cutters I seldom used them. I had to drill a 1/2″ hole in each of the four different size ones to allow me to hold 1/4″, 5/16″,3/8″ and 1/2″. After drilling the hole I also needed to drill and tap two holes in each to allow me to fasten these to the tool holding section.
I think I may have just been lucky when I heated and bent the three bends I did the bends only by eye and they came out flat and the final bend actually came out just about exactly the right length. I drilled a hole through the rod and into the end of the bent section and tapped in a ‘1/8″ Roll Pin.
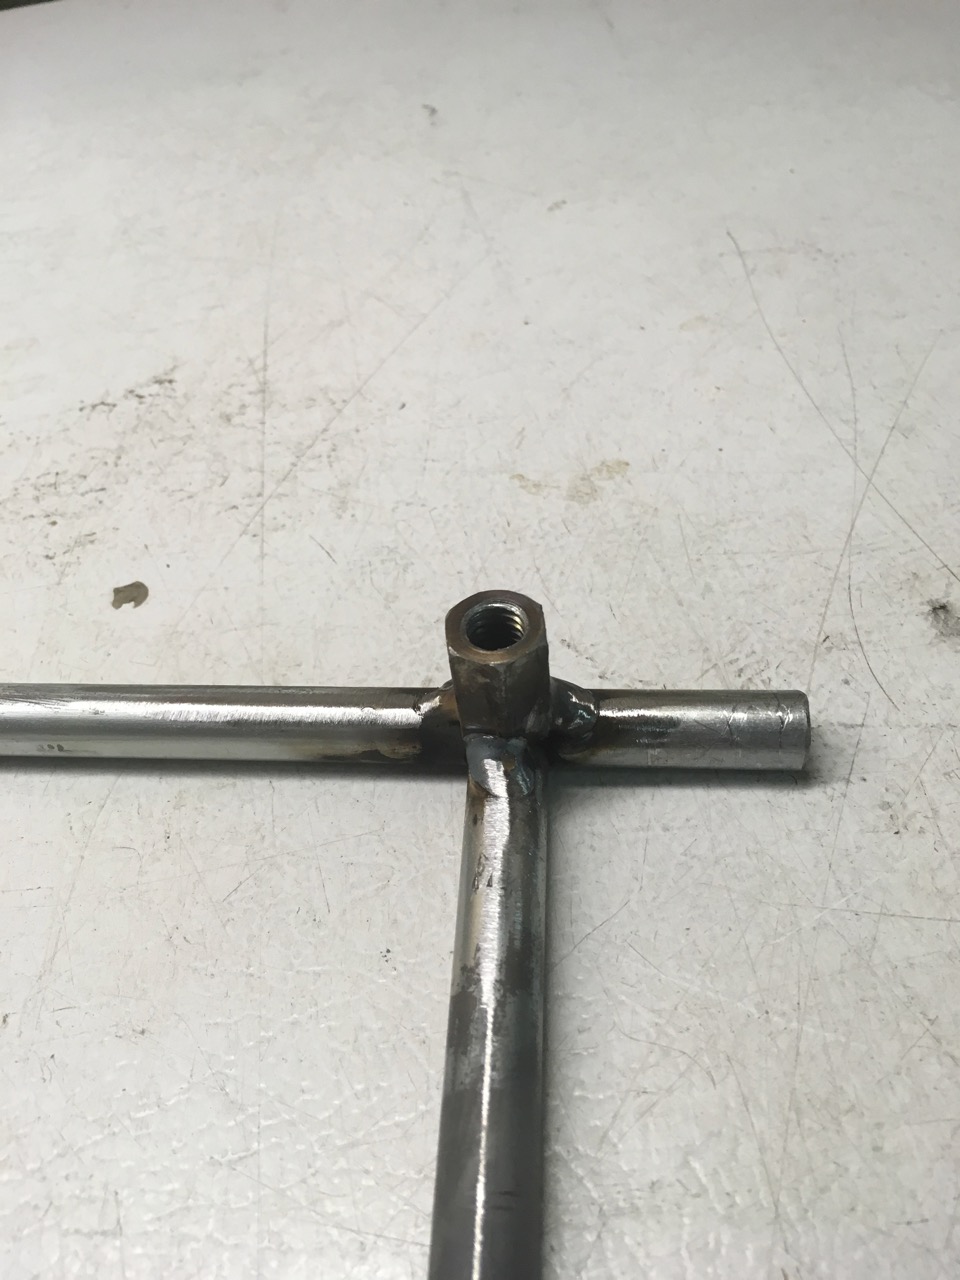
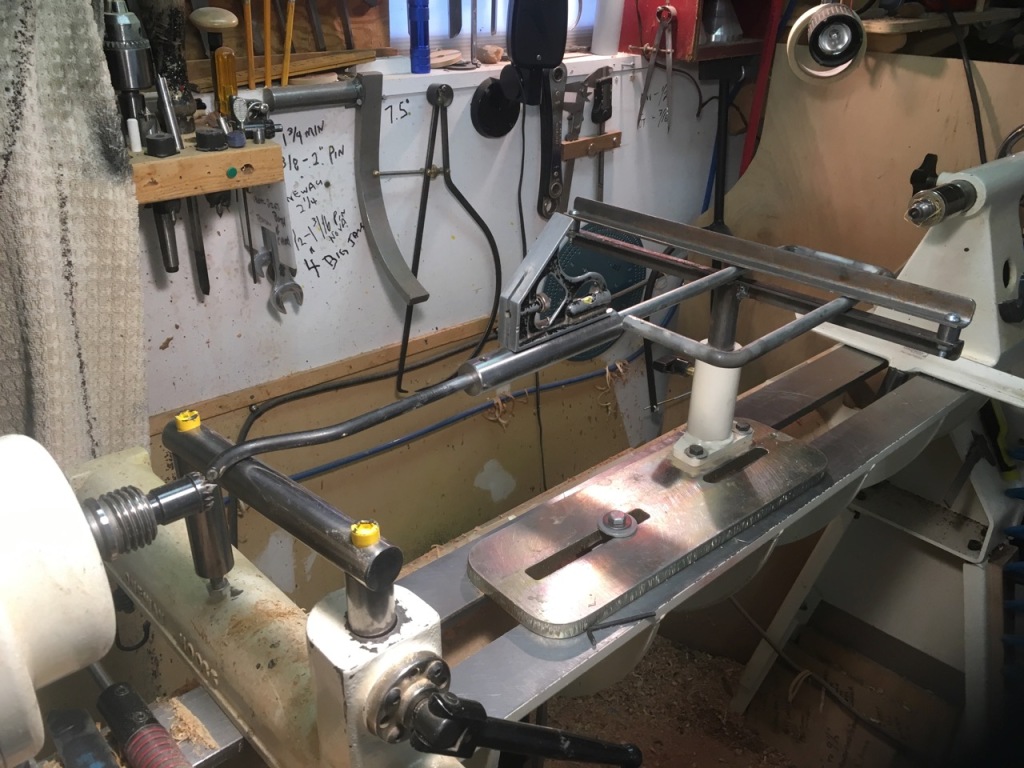
Next to make the support stabilizer. Again I was lucky enough to find a section of 1″ diameter solid steel about the correct length. I cut a notch in one end about 1/2 way through and about 1″ deep.I had planned to bolt the bottom section of angle into this notch but changed my mind and got help from a friend to weld it instead. Glad I did this as it is much much more solid. The bottom was drilled and tapped to take a 3/8″ grub screw. I need to do this I think because when I change sizes of cutters I also have to change the height of the holder to ensure I am cutting on or just below center.
Next I needed spacers that were just slightly longer than 1/2″. Here my small metal lathe really came in handy. I was able to chuck up a couple of short pieces of 1/2 tool steel and precisely make the length I wanted. Because I am not planning to do any larger work with this tool I wanted the two parts to slide easily inside one another.
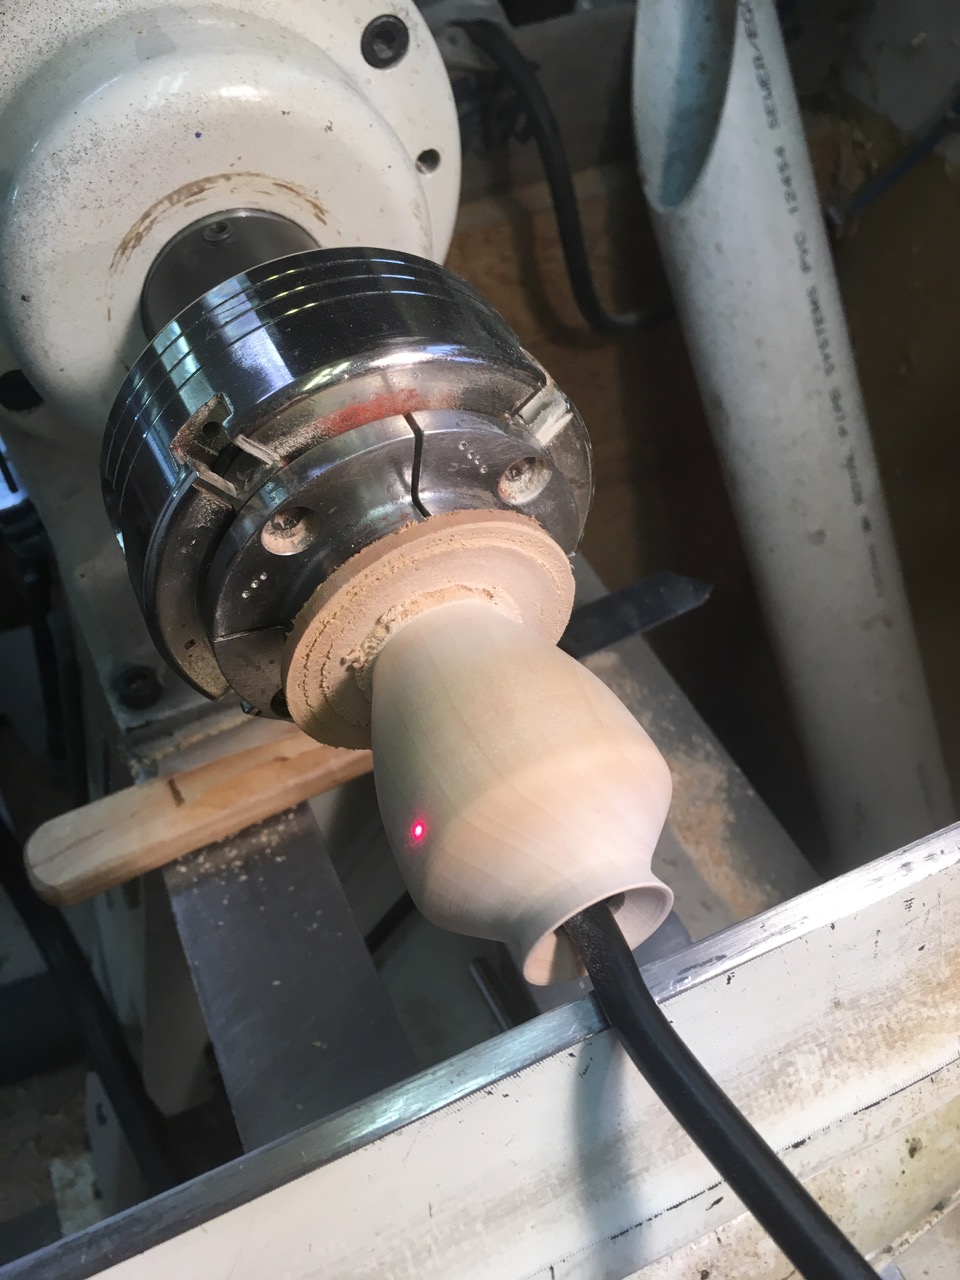
After bolting the angle together with 1/4″ bolts and lock washer with my prepared spacers in between it was time to test the rig. Today I chucked up a small piece of Gravenstien Apple and began the test. I want to be able to work through a small as possible. This means that I can use 1/4″ tools through a 1/2″ hole but even at this the tool does drag a little on the bottom of the opening. I believer the ideal size of opening should be just larger than twice the diameter of the cutter bar.
It worked really good but I soon realized that the continual stopping to test wall thickness and starting again was as pain and I needed to add either or both my laser and camera set up. To allow this I found in my stock a 3/8″ joiner nut which I cut in half then faced off with my metal lathe. I took it to the local Machine shop and paid the grand sum of $5.00 ( no receipt of course) for them to weld it to my rig. This is the same thread as is on the post that holds my laser and video camera.
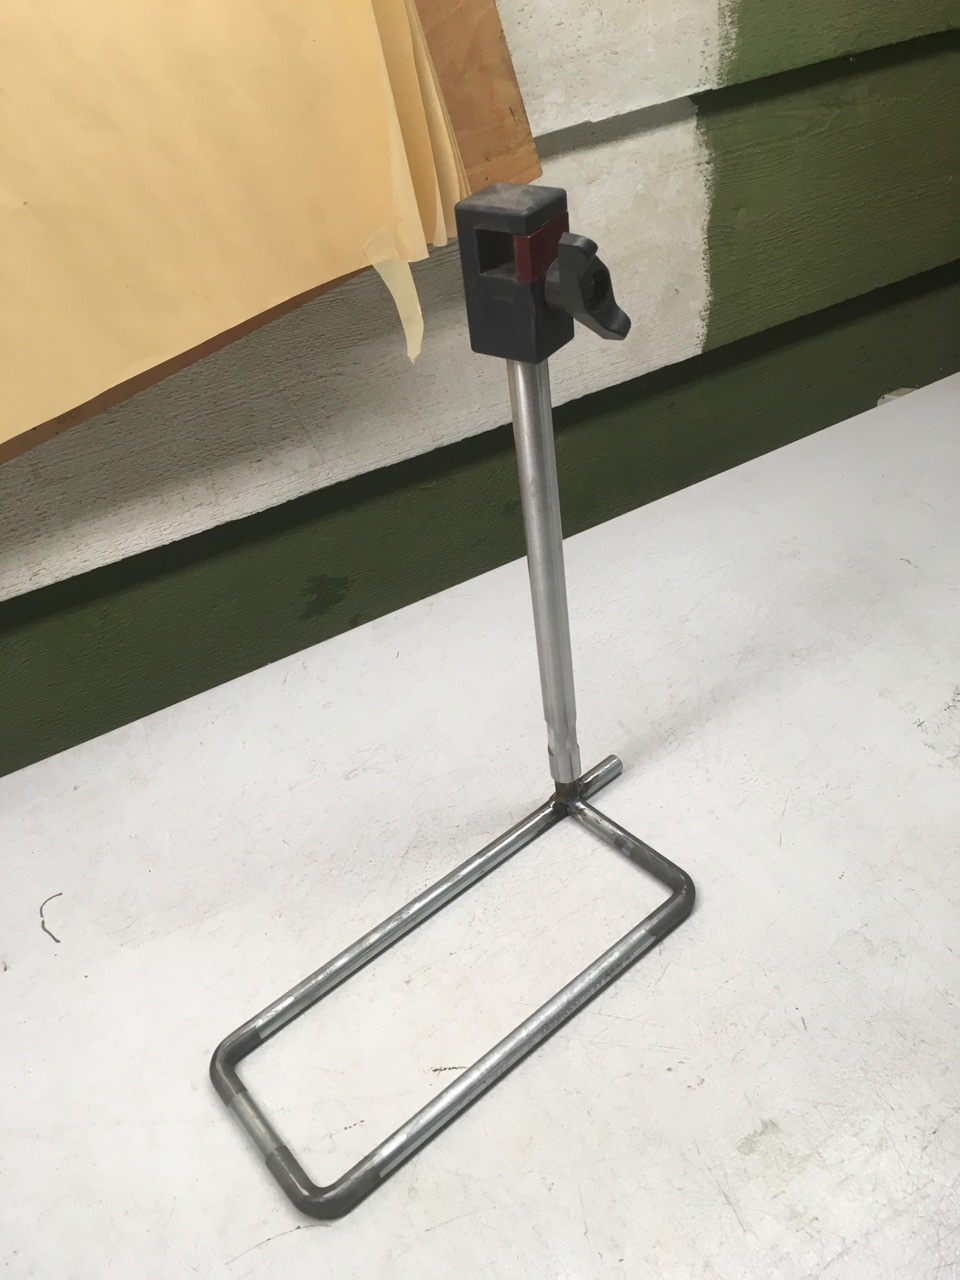
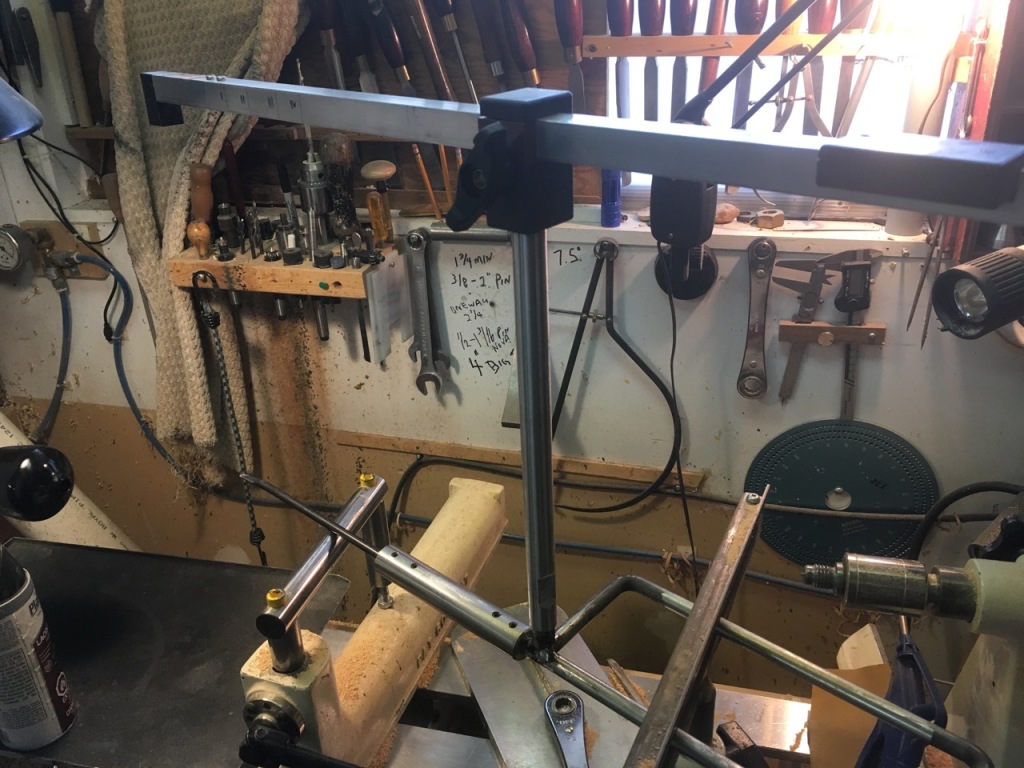
Here’s what the setup looks like from a couple of angles and then with the laser and camera. It does appear overkill but you know what? I don’t care. I may make a new shorter support bar to get the laser and camera closer but for now I think I can work with it just fine.
I know that there are lots of turners who are either already hollowing using video of are thinking about trying this technique. This Blog is meant to be a jumping off spot for those who are still contemplating the process. It’s only the way I do it and not by any means a difinitive way to proceed. I do not plan to share the details of the equipment I use because there are so many choices and I purchased so many years ago the items may no longer be available.
As far as I can remember, the use of video in hollowing became known about 5 years ago when a world renown turner began demo’ing and selling his system.
For those of you how have been living in a cave or on another planet for the past 5 years the technique involves positioning a camera above the cutter and then drawing it’s outline on a sheet of mylar which then appears on the video screen when the cutter is actually in the form. I hope I have explained it well enough but please feel free to contact me should I be able to add anything or help you better understand the technique.
So about 5 years ago and being the cheap SOB that I am, I thought I could hack together my own system. I had an old MS laptop laying around and I had WIFI phones and cameras with the ability to connect to it, but, of course that wasn’t enough for me. I soon was scouring Amazon for cameras etc. I found a very cheap, new I was told, Colonoscope camera. I sure hope it was new!! It had it’s own light but the picture was a problem. Anyway, to cut a long story a little shorter, I found that the Lap top was a pain to set up and take down and by the time I ran the software to get everything working I could have hollowed several vessels using my laser. In addition, the web WIFI cams all had a short ‘lag’ which drove me nuts!! This led me to stop trying the process and continue my old ways using a laser.
I hadn’t totally given up though as I discovered that several turners were using Back-Up Automobile camera set-ups which included a small monitor and camera. Yep, a few were even shown with the lines to back between which I apparently were pretty easy to ignore when hollowing. So of course, I had to try those as well and also found a really cheap video surveillance camera without the monitor and bought that too.
When the part arrived I took a quick look and with all the wires etc. it all seemed way too involved. I’d just rather be turning than messing with all those wires!!
It might be my age or ?? but I have a great deal of trouble remembering peoples names and the turner who demonstrated his video techniques at the last meeting of the Vancouver and District Wood Turners Guild has fallen into that category. It’s too bad because it was his demo that got me thinking a little more about utilizing this technique.
So the next day I hunted around my shop, it took me about 2 hours to remember that I had stashed all the parts in an old sewing box.
The only easy to hook up was the surveillance camera because it came with a 12 volt brick power supply. The back-up-system was designed to wire directly to the 12 volt of a vehicle. Lucky for me I have ‘bricks’ of all voltages and designs in boxes and drawers. I found a 12 volt one, cut the cord and wired it to the back-up system and hooked up the surveillance camera and quickly discovered that the distortion was way too much at close range to be usable.
So with wires going every which way I connected the complete back up system. Dragged it over to my lathe and with a few minor modification had it up and running in no time. It worked great but the back up monitor is only about a 7″ screen. I need something bigger.
I remember that we moved a cable box from a 17″ tv in our kitchen to a room where one of our grandsons ‘hangs’ so he could use it on a large tv that his dad has left for us to store. My wife was quite happy to have it out of the cabinet that it was in now she has more shelf space to display her ‘stuff’.
Ok, so now I am really on to something. I quickly disassembled the foot that the tv stood on and made an aluminum plate from which I could hang it on my exhaust fan box right at the end of my lathe. With a few quick changes it was up and running perfectly.
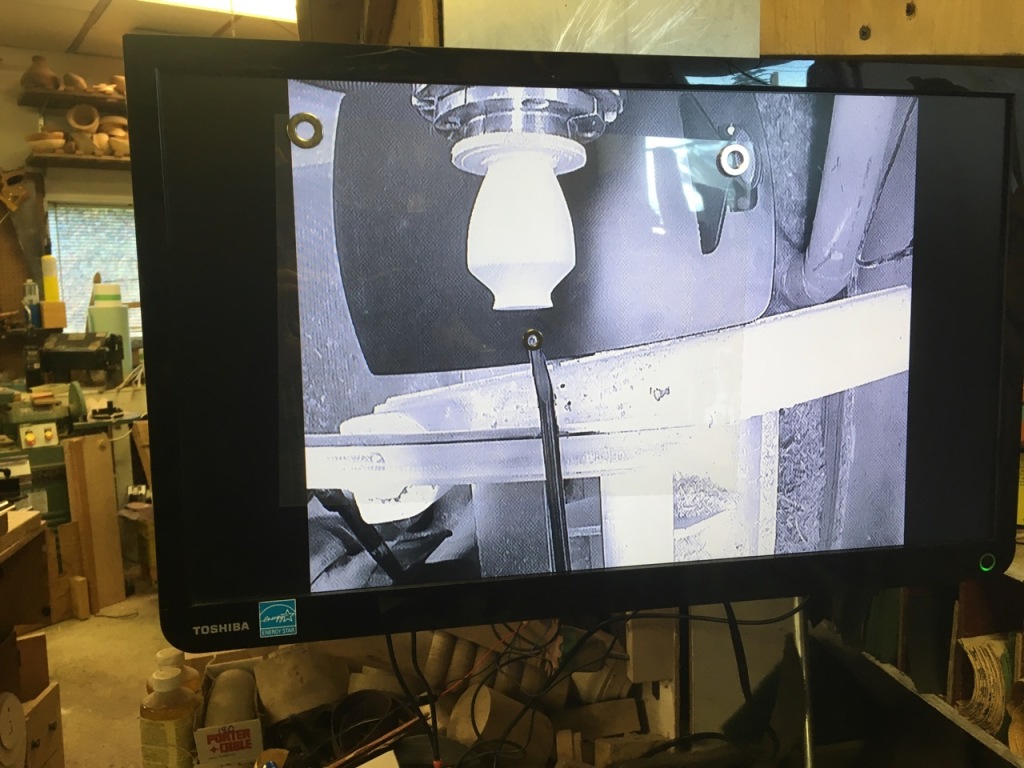
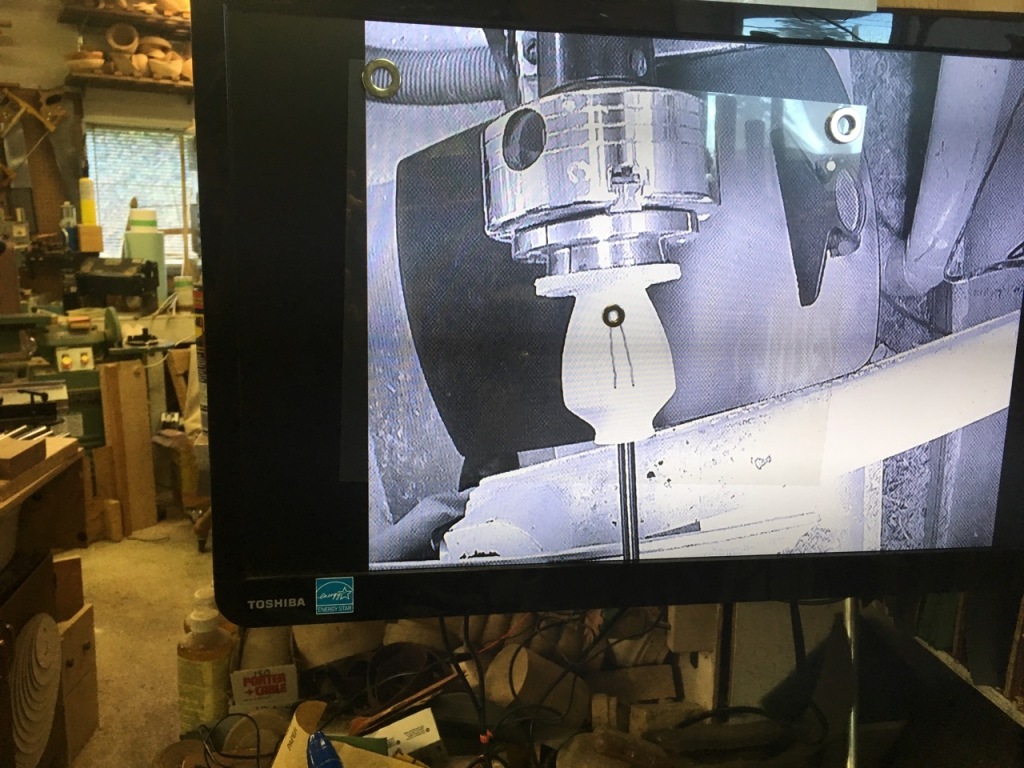
As you can see from the photos I hold mylar film on the tv with magnets and draw the outline of my tool on it with a sharpie. One cool thing about using the magnets as opposed to tape or ?? is that I can easily reposition it should I change the angle of the cutter. In addition I can keep all the old sheets to reuse anytime I am using this system and thus don’t need to keep redrawing the cutter. If I like I could actually leave the TV in place but I need to come up with some sort of cover to keep the dust out so for now I stash it on a shelf. The camera and arm it is attached to simply hang on the wall behind my lathe. The camera does have a small lens cover. I’m not totally convinced that the camera is totally suitable and I continue to search for a cheap replacement. What I believe would work even better is what is termed a ‘closed circuit’ camera.
A couple of ideas that were shared at our last meeting that are exceptionally helpful are to place a white or black piece under the turning to provide contrast at the edge which helps to see where the cutter is. Another is if a round magnet is placed on the screen over the cutter and extending outward it provides a means to ensure the finished thickness is easily delineated.
Here are a couple of screen shots of the round magnet and how it makes it much easier to maintain the finished thickness.
There is one caution I would like too add. Not all cameras and monitors will provide a real time accurate dimension on the screen. The way to be sure you get the thickness you want is to aim your camera at a ruler and then measure the image on the screen to be sure you are getting a one-to-one. Mine is not but it makes no difference to me because once I set the thickness I want with the washer then I just use the edge of it as the guide.
Just a quick note to let anyone who might be interested, know that I now use a negative rake scraper with my hollowing rig. Up till recently I was using a tear drop shaped scraper sharpened in the standard manner but found that on occasion it was just a little grabby.
I thought why not make it into a neg rake scraper so I ground it to about a 60 degree included angle.
After changing the angle the center of the scraper was no longer on the center line and to make up for that I just added a small brass shim under the scraper. I think it is still slightly below center but it seems to work just fine for me.
Seems to work just fine for me.
I am back by popular demand. Actually it was just one turner Dave, who recently took the time to contact me and ask if I was still doing this. I’ve been pretty busy over the spring and summer finishing up work for some very nice clients. I am shutting down my small business at the end of this year and wanted to get as many small jobs done as I could before then.
I have also had some interest shown in the Golf Ball wine bottle stoppers I make and sell at various craft fairs usually this time of year, but I am just too busy to attend any this time around but do want to share with anyone interested in a quick and easy Christmas Gift you can make for a golf nut. Most golfers I know have settled on one particular ball and it is usually a nice treat for them to get a Wine Stopper made from their favourite ball.
If you check this out you will see where I started and now I will add a few details for anyone interested in making a Golf Ball wine stopper. Incidentally, most of my friends wonder what these are for as I am told they NEVER have any wine left on which to use a stopper.
I do use a wood lathe but a metal lathe or even a drill press with a means of holding the ball for drilling will work.
I get most my ‘corks’ Widgets.com but have found that if I am just making a few the plastic ‘corks’ that are used in liquor bottles are the best. They use a synthetic cork that fits nice and tight in a wine bottle allowing the user to lay the bottle on it’s side in the fridge if they want. The one on the left is from Widgets.com the other is from Grey Goose Vodka, it’s the type I prefer.
I drill a 1 1/8 hole in the golf ball about 1 1/4″ deep. Be sure to measure the stopper before drilling and I have found a few wine bottles that will not fit into a 1 1/8″ hole, For these I drill two holes a 1 1/8 hole 1 1/4 deep and a 1 1/4″ hole 7/8″ deep, This allows me to set the ‘cork into the smaller hole to ensure it is centered in the opening.
After that, all there is to do is to rough up the plastic end and sides of the ‘cork’ and glue the it into the golf ball. I use JB Weld Plastic Epoxy. I’m sure that any good glue would do the job.
One added benefit to this type of stopper is that it will sit flat on a counter or display, most stoppers today need a stand with a hole for them to sit upright in.
I am lucky that I seem to be able to find inspiration for my art everywhere I look but lately I have been trying to use nature’s beauty to embellish my work. It all started last fall while I was exchanging some pieces with the Kizmit Gallery in Fort Langley I noticed that there were some fabric scarves on which an artist (whose name slipped my mind) was using leaves and flowers to enhance her pieces. I was so impressed that I wondered why no one in my art space was doing the same thing. And so it began. I immediately started experimenting with methods to transfer vegetation patterns to wood.
I was lucky enough to have been given quite a large quantity of Silver Maple that for the most part is very light in color and has little character. This of course means I get to add my own embellishment.
Fall in BC provides a multitude of natural color options and I began by trying to ‘pound’ leaves from a small maple tree onto some of my work with limited success. Firstly, the wood I was using was not as light as I would like but non-the-less I was encouraged that I was able to get some crude patterns and colors onto a few pieces.
Recently I have made some inroads and am becoming, at least in my mind, a little bit better at getting a reasonable likeness onto wood.
I use a multitude of aids, mostly various types of paper, from wax to paper bags both brown and white, copy paper and paper towels depending on how ‘damp’ the petal is. Sometimes I get a better transfer to the paper than I do to the wood. I’m sure I haven’t exhausted all paper options but for now I seem able to get a reasonable transfer.
I use a small hammer I purchased from Lee Valley which I believe is Japanese and has on one end a slightly semi-rounded face, which seems to work about the best for me. I have tried tapping and rubbing with steel ball bearings of various sizes, rubbing with a short section of smooth drill rod and I continue to experiment.
Here is a shot of the items that I am currently experimenting with.
The process begins by turning a piece of wood with little color and grain. I think a cup or vase shape works best. I have found that if I leave the hollowing for later it is easier for me to do the transferring on a mostly solid piece of wood. I did discover that the surface that works best for me is one that is convex. I generally sand to about 800 but have had some success with 400 as well. After my recent experiments where I tested on wood from straight from a skew to 600 grit I believe better detail is achieved on the more highly sanded wood.
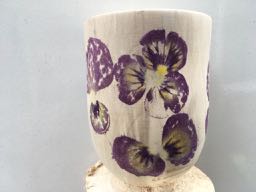
Next I choose a flower petal or petals, so far, Pansies have worked the best particularly dark ones with lighter highlights.
The process is fairly simple, I place the petal or petal cluster on the object where I think it will look the best. If care is taken a small piece of masking tape on a stem might secure the petal. I then carefully cover it with whichever paper I have chosen, wrapping it around the piece and holding the ends of the paper tightly with my fingers without any wrinkles. Masking tape might work to hold the paper here as well.
Now comes the difficulty/exciting part. With the small hammer or other tool, gently tap tap tap the petal trying not to pound too hard while still tapping all parts of the flower. It is easy to pound too hard and wind up with a sort of mushy mess. In the end, the petal or flower part is stuck to the turning and I gently pick it off with a pair of fine tweezers.
Sometimes it doesn’t all come away cleanly, in those cases I don’t scrape it with the tweezers I just leave it to dry and then gently rub it off with a finger or paper towel.
I would still like to be able to add leaves etc. but to date have had little success. I think this is mainly because leaves are too moist. I am presently experimenting with drying them a little in a microwave or just letting them sit for a while before using them but with little success.
If you decide to try this technique please let me know about your successes and failures.
A good way to test this process is to turn a cylinder of the same or a similar wood to that on which you want to transfer and do tests on it. Take notes and then you can later refer to this sampler.
It is quite easy to re-sand and start over and I’m certain that you will have quite a few failures. Keep notes with details such as time of year what wood and which paper you used especially for the times when you are able to get it just right.
Here is a shot of the ‘aftermath’ of my experiments yesterday. I did get some good results and after I let out Pansies produce few more flowers I will be ‘imprinting’ on a few more pieces.
Incidentally, last fall I discovered that I had to hit the item a lot harder to get it to transfer than I am doing this spring. I suppose the colors have set or at least have lost some of their moisture.
I wonder how many other artists have wondered if a ‘brand’ might be a good idea? I know there are a lot of Artists whose work can easily be identified but for artists like myself this is a real long-shot!
I really like to identify my art with my name and a number. The number primarily for me to keep track of where my art winds up and to be able to keep a data base of information.
The problem for me was that on occasion I make smaller things to sell and often don’t have the inclination or space to actually sign them.
For about the last 2 years I have been adding a ‘brand’ it is a stylized icon combining my first and last initials. P and B. i have been burning my ‘brand’ with a pyrography pen which is a real pain if I am ‘branding’ 20 or 30 items at a time!
Here is a shot of the ‘brand’ I just bought on line. I was able to purchase just the branding end as I already have a Weller soldering iron I wanted to use.
I am now using on all my art work. I still sign my better pieces, and add the brand, but for craft type items I can now brand a bunch in a very short time.
The continuing saga of my path to discover an ‘easy’ way to sand the inside of hollow forms.
If you read the previous post and are following along then here is the next edition.
I previously purchased a rock tumbler at a garage sale this is a much faster turning devise than either of the BBQ motors I was trying earlier.
With the increase in speed I can in two days get the same revolutions I was getting in 2 weeks. I do realize that at some point if it spins too fast the glass will just cling to the outer walls and not tumble or grind the inside of the hollow form as I intend to.
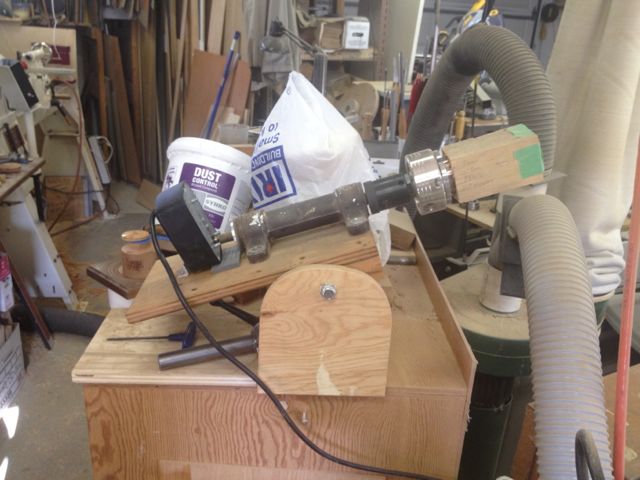
The rock tumbler uses a 1725 rpm motor connected to a 1.5″ dia pulley which is then connected with a vee belt to a 9″ pulley. Please feel free to correct me if I’m wrong but by my calculations this devise now spins my hollow forms at 287.5 RPM. I wondered if it might be too fast but I can hear the glass and marbles (yes I have included marbles this time around) sliding and grinding as it spins. I am certainly not a machinest and the part that is in between my chuck and the shaft of the pillow block is not a tight fit and as a result the chuck ‘wobbles’ a little which i believe may add to it’s ability to sand.
Here’s a shot of my ‘re-cobbled’ devise.
I tip it slightly toward the bottom and alternately the top in an attempt to get the glass and the marbles working more on the ends where the torn grain is. I try to tip it about about 2″ and run about half time with it tipped each way.
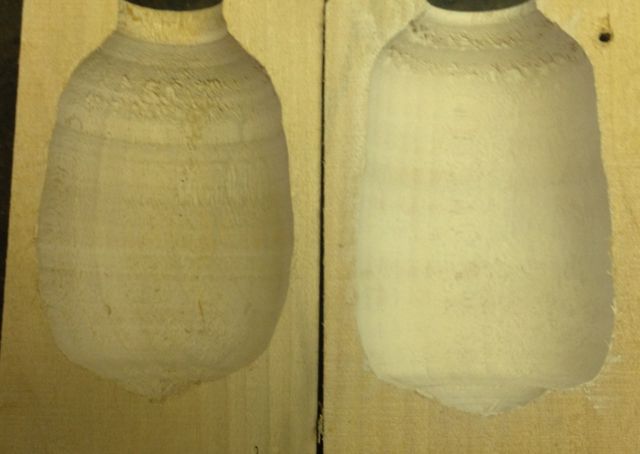
Here is a comparison shot of one piece before sanding and after about 300,000 rotations.
And a closeup of the one on the right.
I think you can see quite an improvement as far as sanding and removal of ridges goes but as you can see it hasn’t cleaned up the torn end grain.
If I was to do a finished Hollow form I would spend a little more time with my tools to try to minimize the torn grain prior to using my sanding devise.
Please feel free to email me if you have any comments or questions.
Occasionally I really want a really good finish on the inside of a Hollow Form no matter how big the opening is. An example would be when I want to pierce the form with some sort of art that would allow people to get a good look at the inside. Another might be when I make a Hollow Form influenced by harvey Fein. His work frequently has openings in the shape of slits or slots that go all the way through the piece.
To this end I read somewhere that if pieces of broken tempered glass are put inside and slowly rotated they will eventually finely finish the inside.
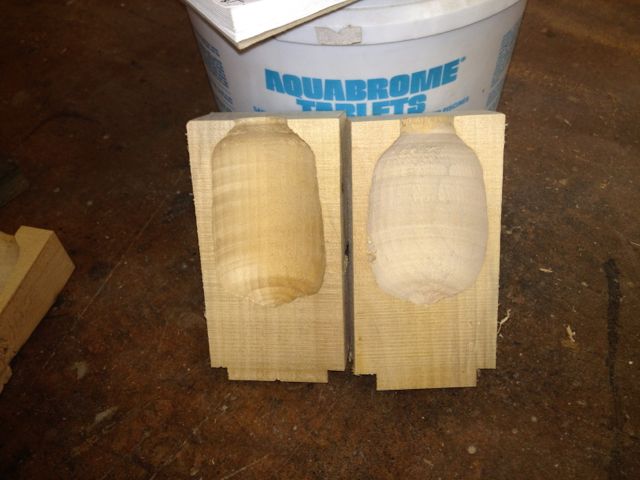
I am presently experimenting with this process and have rough turned the inside of a couple of blocks of Birch. I used my Kobra hollowing system and made no attempt to get a smooth interior. I did perform a final light cut with a freshly sharpened cuter. The intention was to leave some roughness and some ridges.
The blocks are about 3″ square and 5 1/2 long.
Here is a photo of the devise I cobbled together with parts I had laying around.
It enables me to angle the turning if I want more finishing done towards either end. The original BBQ rotisserie motor turned twice as fast as my current one. I had planned to turn a week with it slanting towards the top and a week towards the bottom but during the process I decided I needed to keep track of revolutions rather than days/weeks.
Here is a picture of one of them prior to beginning the process.
Here is a photo comparing the one on the left (unsanded) and on the right the sanded one.
This was accomplished in about 8600 Revolutions.
As you can see the section on the left does have a much nicer finish and actually feels as if it has been sanded quite well. It did not however remove much of the ridges. I think I will devise a faster turning model and give it a try again. Sanding with more revolutions this time.
On another thread someone suggested the addition of marbles along with the glass and this I will try next.
Friday last was the day I had been looking forward to for a couple of months. My date with Molly!
Well I was not to be disappointed.
After the 1 1/2 hour drive including having my GPS take me to the wrong address I finally wound up at Bow River Woods. I never did find any sort of sign the establishment but those in the know seem to be able to find it with little directions.
There were 10 attendees in all.
Molly started off, after introducing herself, by asking each of us why we were there and what we hoped to gain from the experience. From there she tried to accommodate all interests. She started by turing a miniature hollow form. Molly turns most of her miniature pieces in spindle orientation and really likes to turn green. This is the type of work she is most known for. Her communication and lathe skill are really good although I believe the small hollow form really didn’t let us get too good a look at all her abilities. Through out the turning she would stop and talk about tools, good design and what works especially for her.
She didn’t have a good torch but described the process of making hollowing tools from Allen wrenches, which she used to hollow the miniature form.
Once the hollow form was complete we moved back to our tables and were coached in burning techniques and preparation of tools. Then were given some time to practice. From there we were shown her method of making the ‘brands’ she uses to embellish her work. Including a ‘basket weave’ brand and a ‘spiral’ brand. She had both for sale but suggested that we should probably save money by just making them ourselves.
She briefly discussed the tricks she has developed in making her own buying hand pieces, pretty cool. I will certainly try to make a few myself. Just cause I’m cheap!
Molly spirit and easy manner made the whole experience most satisfying, it was almost as if it was just a bunch of long time friends getting together to share experiences.
Molly then demonstrated how she carves the tops of some of her forms to make here signature three cornered top. This was pretty cool and she completed it in the wink of an eye.
She followed that up with tips regarding a whole lot of specialized finishing and colouring techniques which I found most interesting.
I had taken a strange burning tool I had bought at a garage sale, manufactured in Columbia, which had about 100 brands, Molly as well as other attendees found very interesting, toward the end, Molly offered to trade one of her miniatures for several of the brands which surprisingly fit in her burning hand pieces. I was most happy to bring one of her signed pieces home.